
Start your VPS now with FREE $100 credit.
NGINX (also known as engine X) is a high-performance HTTP web server, load balancer, reverse proxy, cache, mail proxy and streaming media server. It’s a free and open-source web server, just like the Apache web server, so you can use a Nginx freely without spend the costs. NGINX can also work as a reverse proxy in the front of the Apache web server. NGINX was first introduced in 2004 by Igor Sysoev and released under 2-clause BSD license. However, since 2019, Nginx was acquired by F5 with $670 USD million acquitition values.
NGINX can be deployed on almost all operating system, including Windows, Linux, MacOS, and other OS. Unlike Apache which depend on Virtual Hosts (vhost) and .htaccess rewrite rules, NGINX work seamlessly with its serverblock itself to hosted any type of websites or blogs. So, you don’t need a .htaccess rewrite rule if you’re running Nginx web server on your machine.
Currently the latest stable branch of the NGINX web server is available in version 1.22.0 which released in 24 May 2022. While the Nginx mainline branch is available in version 1.21.6, which was released in 25 January 2022. Please note that mainline version of Nginx web server is usually using for development purpose, and it’s not intended for production environment.
Here's changelog for NGINX stable branch version 1.22.0:
-----------------------------------------------------------------------------

Changes with nginx 1.22.0 24 May 2022

*) 1.22.x stable branch.

Changes with nginx 1.21.6 25 Jan 2022

*) Bugfix: when using EPOLLEXCLUSIVE on Linux client connections were
unevenly distributed among worker processes.

*) Bugfix: nginx returned the "Connection: keep-alive" header line in
responses during graceful shutdown of old worker processes.

*) Bugfix: in the "ssl_session_ticket_key" when using TLSv1.3.

Changes with nginx 1.21.5 28 Dec 2021

*) Change: now nginx is built with the PCRE2 library by default.

*) Change: now nginx always uses sendfile(SF_NODISKIO) on FreeBSD.

*) Feature: support for sendfile(SF_NOCACHE) on FreeBSD.

*) Feature: the $ssl_curve variable.

*) Bugfix: connections might hang when using HTTP/2 without SSL with the
"sendfile" and "aio" directives.
-----------------------------------------------------------------------------
Well, today we will guide you on how to install the latest stable branch of Nginx web server (nginx-1.22.0) on CentOS Stream 9 running under cheap $5 cloud server in Digital Ocean. However, make sure to meet the following requirenment before installing NGINX on CentOS Stream 9.
PREREQUISITES:
* VPS, Cloud or Bare-Metal
* Running under CentOS Stream 9
* Server IPv4 Address with Superuser Privileges (Root Access)
* Nano or VIM Editor
* Gnome Terminal for Linux Desktop
* PuTTy SSH Client for Windows or Mac
* Powershell for Windows 10/11
1.) Login to Your Machine via SSH Terminal
First of all, you need to login to your server via SSH terminal. Make sure to use learning media environment if you’re install NGINX for learning or education only.
$ ssh [email protected] -p4322
[email protected]'s password:
Activate the web console with: systemctl enable --now cockpit.socket

Last login: Thu May 26 02:53:51 2022 from 198.211.111.194
PLEASE NOTE: Make sure to change “104.131.86.105” with your actual server IPv4 address and SSHD port 4322 with your actual SSHD port number.
2.) Install Package Dependency or Prerequisites
Then you need to install package dependency or prerequisites in order to install NGINX web server on CentOS Stream 9. You can use either yum or dnf command if running in dnf-based system.
$ dnf install yum-utils -y
DigitalOcean Agent 40 kB/s | 3.3 kB 00:00
DigitalOcean Droplet Agent 27 kB/s | 3.3 kB 00:00
Package yum-utils-4.0.24-3.el9.noarch is already installed.
Dependencies resolved.
=====================================================================================================================================================
Package Architecture Version Repository Size
=====================================================================================================================================================
Upgrading:
dnf noarch 4.12.0-1.el9 baseos 463 k
dnf-data noarch 4.12.0-1.el9 baseos 44 k
dnf-plugins-core noarch 4.1.0-1.el9 baseos 35 k
libdnf x86_64 0.67.0-1.el9 baseos 666 k
libsolv x86_64 0.7.22-1.el9 baseos 393 k
python3-dnf noarch 4.12.0-1.el9 baseos 465 k
python3-dnf-plugins-core noarch 4.1.0-1.el9 baseos 236 k
python3-hawkey x86_64 0.67.0-1.el9 baseos 109 k
python3-libdnf x86_64 0.67.0-1.el9 baseos 786 k
yum noarch 4.12.0-1.el9 baseos 94 k
yum-utils noarch 4.1.0-1.el9 baseos 42 k

Transaction Summary
=====================================================================================================================================================
Upgrade 11 Packages

Total download size: 3.3 M
3.) Install Linux Text Editors
Don’t forget to install your prefered text editors for Linux, either it Nano, VIM, Gedit, Sublime, Atom or VSCode. Simply run the following commands to install one of above text editors. On this tutorial we will use nano or vim editor.
$ dnf install nano -y
OR
$ dnf install vim -y
4.) Add the Official NGINX Repository for RHEL/CentOS
NGINX can be installed and configured in almost all Linux-based operating system, including Red Hat Enterprise Linux (RHEL) / CentOS 7.4+, 8.x, and 9.x, Debian 10 “buster” and Debian 11 “bullseye”, Ubuntu 18.04 “bionic” – Ubuntu 22.04 LTS “jammy jellyfish”, SLES 12 SP5+ and 15 SP2+, Alpine 3.13 – 3.16, and Amazon Linux version 2 (LTS).
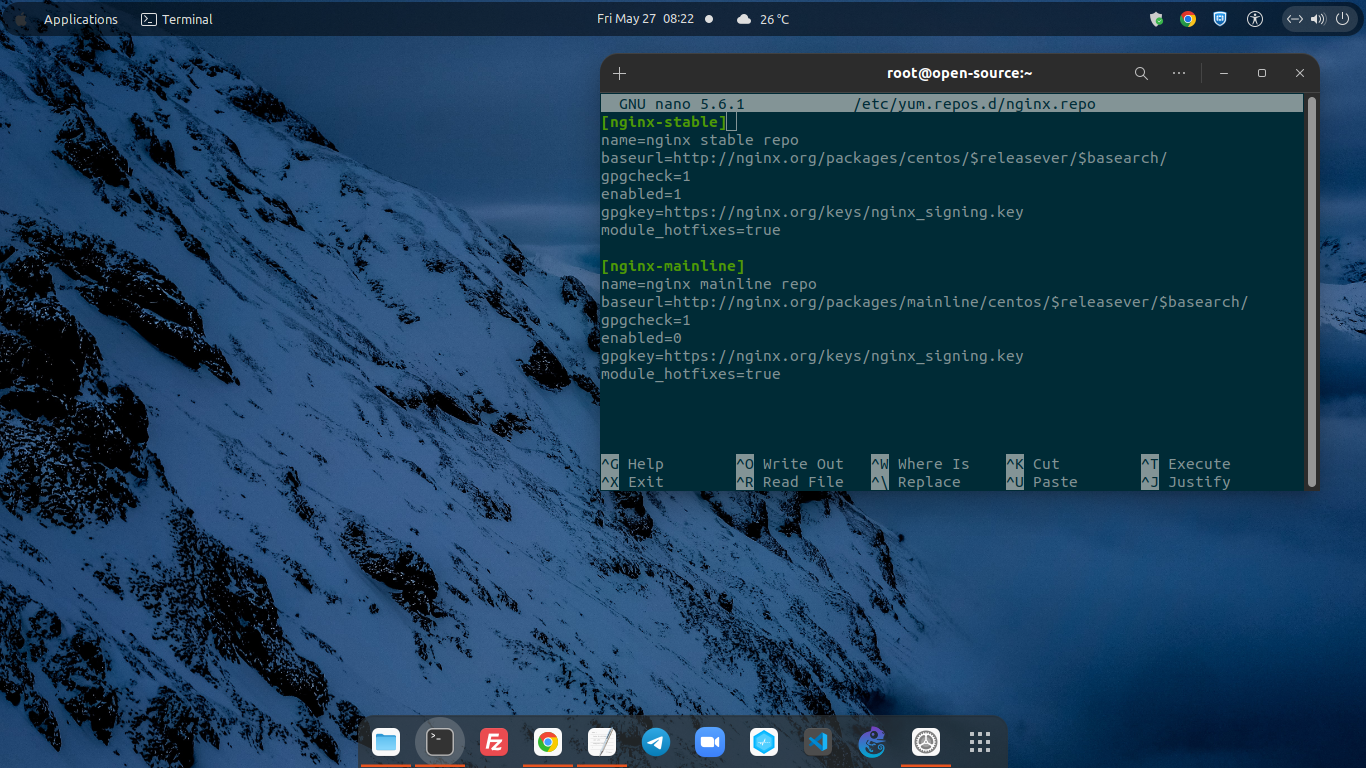
Simple create a file called “nginx.repo” in directory of /etc/yum.repos.d/ to setting up the NGINX yum repository for RHEL/CentOS. Then put the following repository in a “nginx.repo” file.
-----------------------------------------------------------------------------
$ nano /etc/yum.repos.d/nginx.repo
-----------------------------------------------------------------------------

[nginx-stable]
name=nginx stable repo
baseurl=http://nginx.org/packages/centos/$releasever/$basearch/
gpgcheck=1
enabled=1
gpgkey=https://nginx.org/keys/nginx_signing.key
module_hotfixes=true

[nginx-mainline]
name=nginx mainline repo
baseurl=http://nginx.org/packages/mainline/centos/$releasever/$basearch/
gpgcheck=1
enabled=0
gpgkey=https://nginx.org/keys/nginx_signing.key
module_hotfixes=true
-----------------------------------------------------------------------------
5.) Install NGINX Stable Branch
The stable branch repository for NGINX packages will be used by default. So, if you want to use NGINX mainline branch you need to run the following command to enable Nginx mainline repository on your CentOS 9 machine.
$ sudo yum-config-manager --enable nginx-mainline
Then simply run the following command to Install Nginx web server on CentOS Stream 9. Please note that during the installation progress you will prompted to accept the NGINX GPG key, then you can verify that the fingerprint is matches to fingerprint numbers “573B FD6B 3D8F BC64 1079 A6AB ABF5 BD82 7BD9 BF62”. If so, kindly accept it and press “y”.
$ dnf install nginx -y
nginx stable repo 18 kB/s | 8.2 kB 00:00
Dependencies resolved.
=====================================================================================================================================================
Package Architecture Version Repository Size
=====================================================================================================================================================
Installing:
nginx x86_64 1:1.22.0-1.el9.ngx nginx-stable 861 k

Transaction Summary
=====================================================================================================================================================
Install 1 Package

Total download size: 861 k
Installed size: 2.9 M
Downloading Packages:
nginx-1.22.0-1.el9.ngx.x86_64.rpm 1.4 MB/s | 861 kB 00:00
-----------------------------------------------------------------------------------------------------------------------------------------------------
Total 1.4 MB/s | 861 kB 00:00
nginx stable repo 3.3 kB/s | 1.5 kB 00:00
Importing GPG key 0x7BD9BF62:
Userid : "nginx signing key <[email protected]>"
Fingerprint: 573B FD6B 3D8F BC64 1079 A6AB ABF5 BD82 7BD9 BF62
From : https://nginx.org/keys/nginx_signing.key
Key imported successfully
Running transaction check
Transaction check succeeded.
Running transaction test
Transaction test succeeded.
Running transaction
Preparing : 1/1
Running scriptlet: nginx-1:1.22.0-1.el9.ngx.x86_64 1/1
Installing : nginx-1:1.22.0-1.el9.ngx.x86_64 1/1
Running scriptlet: nginx-1:1.22.0-1.el9.ngx.x86_64 1/1
----------------------------------------------------------------------

Thanks for using nginx!

Please find the official documentation for nginx here:
* https://nginx.org/en/docs/

Please subscribe to nginx-announce mailing list to get
the most important news about nginx:
* https://nginx.org/en/support.html

Commercial subscriptions for nginx are available on:
* https://nginx.com/products/

----------------------------------------------------------------------

Verifying : nginx-1:1.22.0-1.el9.ngx.x86_64 1/1

Installed:
nginx-1:1.22.0-1.el9.ngx.x86_64

Complete!
6.) Verify NGINX Version
After that you can verify NGINX version which have been installed on your CentOS 9 machine using the following commands.
$ nginx -v
nginx version: nginx/1.22.0
Or use a below command to print detailed view of NGINX stable branch version which have been installed on your CentOS 9 server.
 (GCC)")
$ nginx -V
nginx version: nginx/1.22.0
built by gcc 11.2.1 20220127 (Red Hat 11.2.1-9) (GCC)
built with OpenSSL 3.0.1 14 Dec 2021
TLS SNI support enabled
configure arguments: --prefix=/etc/nginx --sbin-path=/usr/sbin/nginx --modules-path=/usr/lib64/nginx/modules --conf-path=/etc/nginx/nginx.conf --error-log-path=/var/log/nginx/error.log --http-log-path=/var/log/nginx/access.log --pid-path=/var/run/nginx.pid --lock-path=/var/run/nginx.lock --http-client-body-temp-path=/var/cache/nginx/client_temp --http-proxy-temp-path=/var/cache/nginx/proxy_temp --http-fastcgi-temp-path=/var/cache/nginx/fastcgi_temp --http-uwsgi-temp-path=/var/cache/nginx/uwsgi_temp --http-scgi-temp-path=/var/cache/nginx/scgi_temp --user=nginx --group=nginx --with-compat --with-file-aio --with-threads --with-http_addition_module --with-http_auth_request_module --with-http_dav_module --with-http_flv_module --with-http_gunzip_module --with-http_gzip_static_module --with-http_mp4_module --with-http_random_index_module --with-http_realip_module --with-http_secure_link_module --with-http_slice_module --with-http_ssl_module --with-http_stub_status_module --with-http_sub_module --with-http_v2_module --with-mail --with-mail_ssl_module --with-stream --with-stream_realip_module --with-stream_ssl_module --with-stream_ssl_preread_module --with-cc-opt='-O2 -flto=auto -ffat-lto-objects -fexceptions -g -grecord-gcc-switches -pipe -Wall -Werror=format-security -Wp,-D_FORTIFY_SOURCE=2 -Wp,-D_GLIBCXX_ASSERTIONS -specs=/usr/lib/rpm/redhat/redhat-hardened-cc1 -fstack-protector-strong -specs=/usr/lib/rpm/redhat/redhat-annobin-cc1 -m64 -march=x86-64-v2 -mtune=generic -fasynchronous-unwind-tables -fstack-clash-protection -fcf-protection -fPIC' --with-ld-opt='-Wl,-z,relro -Wl,-z,now -pie'
7.) Commands to Manage NGINX Web Server
In RHEL-based distros, including CentOS, Fedora, Cloud Linux, Oracle Linux, Rocky Linux and AlmaLinux, you can utilize the following commands to manage NGINX Web Server on your cloud machine.
To enable NGINX Web Server to start automatically from VM boot, you can use the following command:
$ systemctl enable nginx
Created symlink /etc/systemd/system/multi-user.target.wants/nginx.service → /usr/lib/systemd/system/nginx.service.
To start Nginx:
$ systemctl start nginx
To Stop Nginx:
$ systemctl stop nginx
To Restart Nginx:
$ systemctl restart nginx
8.) Let’s Add TCP Port 80 and 443 to Firewalld Rules
If you have active running Firewalld on your CentOS 9 machine, don’t forget to add the following TCP port into your Firewall rules. So your web server could be accessed in public internet, or not blocked by your Firewall rules. However, please note that it will make your server IPv4 address (not private IP) exposed in public internet. Simply run the following commands.
* Add TCP Port 80 to Firewall Rules
$ sudo firewall-cmd --add-port 80/tcp
success

$ sudo firewall-cmd --add-port 80/tcp --permanent
success

$ sudo firewall-cmd --zone=public --permanent --add-port=80/tcp
Warning: ALREADY_ENABLED: 80:tcp
success
* Add TCP Port 443 to Firewall Rules
$ sudo firewall-cmd --add-port 443/tcp
success

$ sudo firewall-cmd --add-port 443/tcp --permanent
success

$ sudo firewall-cmd --zone=public --permanent --add-port=443/tcp
Warning: ALREADY_ENABLED: 443:tcp
success
CONCLUSIONS:
You have been successfully in setting up, install and manage running NGINX web server on CentOS Stream 9. After that you can configure NGINX server block in order to hosted your websites or blogs.
