
Start your VPS now with FREE $100 credit.
Let’s Encrypt CA provides an easy solution to get a free SSL/TLS certificate that allows HTTPS connections on a website.
Not only free; to install and renew an SSL certificate with Let’s Encrypt is fully automated, both on the Apache and Nginx web servers.
Let’s Encrypt SSL certificate is valid for up to 90 days, but users can renew at any time.
Let’s Encrypt is run by the Internet Security Research Group (ISRG) as a non-profit certificate authority. ISRG is a Californian public-benefit corporation that has a primary focus on internet security.
Well, in this tutorial we will guide you on how to configure Let’s Encrypt SSL with Nginx FastCGI-Cache on the Ubuntu 19.04 LTS server (Disco Dingo).
If you have followed our previous tutorial, you should now have a WordPress-based website that runs on the Nginx web server with a FastCGI-Cache, MariaDB v10.4, and PHP7.3-FPM.
The tutorial should work well in previous versions of Ubuntu LTS, including Ubuntu 18.04 and 16.04 LTS.
REQUIREMENTS
- VPS / Cloud Server / Dedicated Server running on Ubuntu 19.04 LTS (Disco Dingo) / 18.04 LTS (Bionic Beaver) / 16.04 LTS (Xenial Xerus)
- Root privileges to connect to your server via SSH terminal
- Already have a WordPress-based site running on LEMP Stack with FastCGI-Cache
- Your WP site must be live and publicly accessible on the internet
1. Install Certbot ACME Client
Let’s Encrypt has EFF’s Certbot ACME client to get free SSL certificates and most of the steps are handled by Certbot, including in terms of renewing SSL certificates.
Let’s Encrypt CA recommends that most people who have shell access on their server should use the Certbot ACME client in order to install or renew the Let’s Encrypt SSL certificate for their website.
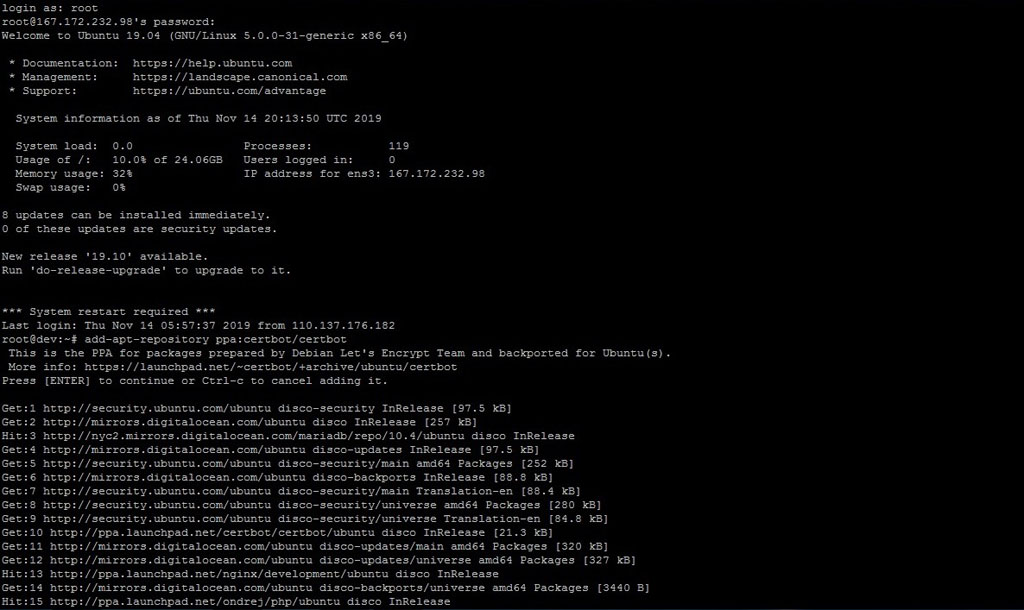
We need to add the Certbot repository (PPA) first to our Ubuntu system, since the Certbot package from Ubuntu is outdated.
This is an official Certbot PPA (Personal Package Archives) which is currently in active development. It’s maintained by the Debian Let’s Encrypt Team and backported for Ubuntu server.
So let’s install the most up-to-date version of the Certbot ACME client on your Ubuntu server with this PPA, including the Nginx Certbot package.
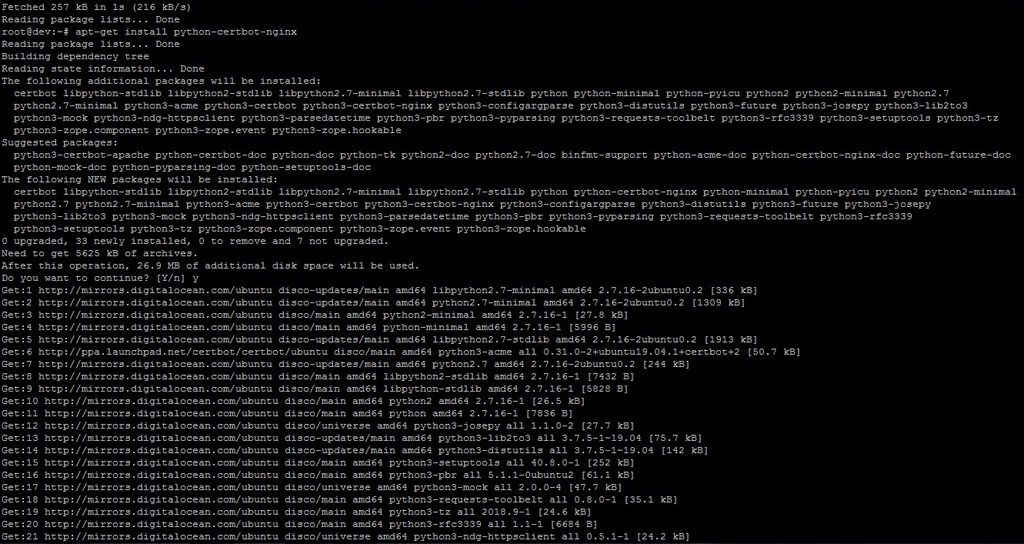
$ add-apt-repository ppa:certbot/certbot
$ apt-get update
$ apt-get install python-certbot-nginx -y
2. Generate Free SSL Certificates with Let’s Encrypt
Simply run the following command to generate a free SSL certificate with Let’s Encrypt. Make sure to replace dev.node35.com with your actual active domain name or subdomain.
$ certbot --nginx -d dev.node35.com -d www.dev.node35.com
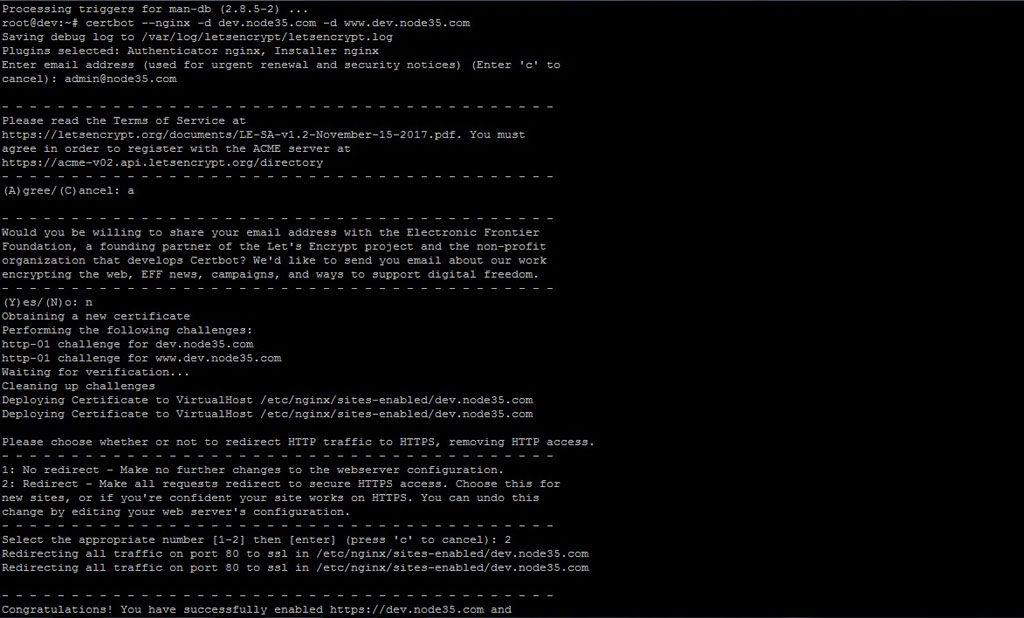
Obtaining a new certificate
Performing the following challenges:
http-01 challenge for dev.node35.com
http-01 challenge for www.dev.node35.com
Waiting for verification...
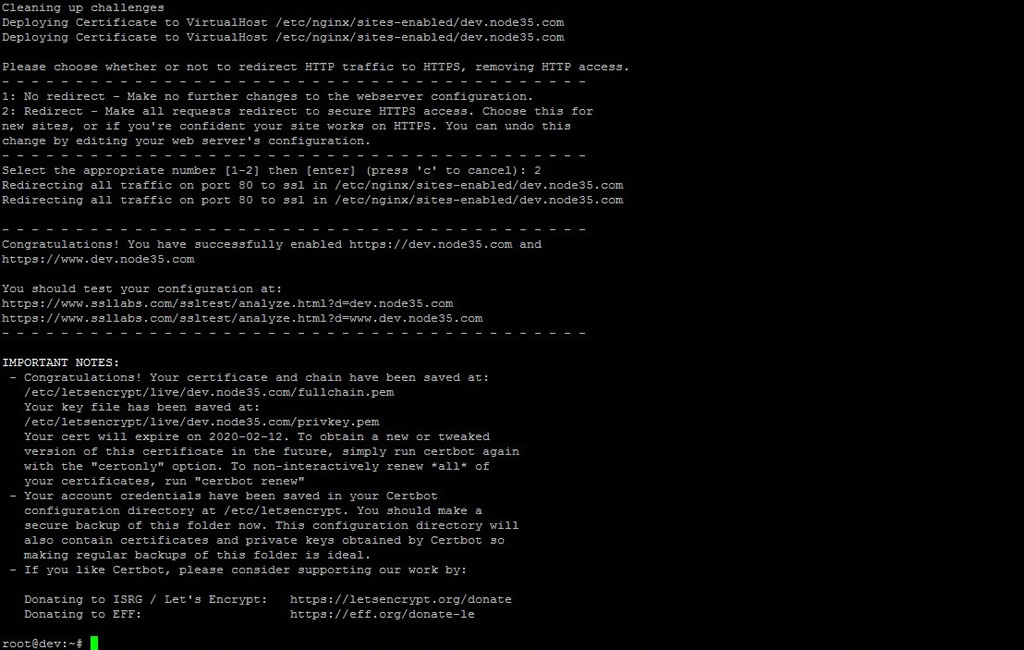
Cleaning up challenges
Deploying Certificate to VirtualHost /etc/nginx/sites-enabled/dev.node35.com
Deploying Certificate to VirtualHost /etc/nginx/sites-enabled/dev.node35.com
Please choose whether or not to redirect HTTP traffic to HTTPS, removing HTTP access.
- - - - - - - - - - - - - - - - - - - - - - - - - - - - - - - - - - - - - - - -
1: No redirect - Make no further changes to the webserver configuration.
2: Redirect - Make all requests redirect to secure HTTPS access. Choose this for
new sites, or if you're confident your site works on HTTPS. You can undo this
change by editing your web server's configuration.
- - - - - - - - - - - - - - - - - - - - - - - - - - - - - - - - - - - - - - - -
Select the appropriate number [1-2] then [enter] (press 'c' to cancel): 2
Redirecting all traffic on port 80 to ssl in /etc/nginx/sites-enabled/dev.node35.com
Redirecting all traffic on port 80 to ssl in /etc/nginx/sites-enabled/dev.node35.com
- - - - - - - - - - - - - - - - - - - - - - - - - - - - - - - - - - - - - - - -
Congratulations! You have successfully enabled https://dev.node35.com and
https://www.dev.node35.com
You should test your configuration at:
https://www.ssllabs.com/ssltest/analyze.html?d=dev.node35.com
https://www.ssllabs.com/ssltest/analyze.html?d=www.dev.node35.com
- - - - - - - - - - - - - - - - - - - - - - - - - - - - - - - - - - - - - - - -
IMPORTANT NOTES:
- Congratulations! Your certificate and chain have been saved at:
/etc/letsencrypt/live/dev.node35.com/fullchain.pem
Your key file has been saved at:
/etc/letsencrypt/live/dev.node35.com/privkey.pem
Your cert will expire on 2020-02-12. To obtain a new or tweaked
version of this certificate in the future, simply run certbot again
with the "certonly" option. To non-interactively renew *all* of
your certificates, run "certbot renew"
- Your account credentials have been saved in your Certbot
configuration directory at /etc/letsencrypt. You should make a
secure backup of this folder now. This configuration directory will
also contain certificates and private keys obtained by Certbot so
making regular backups of this folder is ideal.
- If you like Certbot, please consider supporting our work by:
Donating to ISRG / Let's Encrypt: https://letsencrypt.org/donate
Donating to EFF: https://eff.org/donate-le
root@dev:~#3. Modify Your ServerBlock to Run Nginx with HTTP/2 Support
If you want to run Nginx with HTTP/2 Support, you must modify your site’s serverblock (vhosts).
Basically, the Certbot Nginx client has modified your Nginx serverblock as soon as you successfully generate a free SSL certificate from Let’s Encrypt.
However, it’s not configured to run Nginx in the HTTP/2 network protocol.
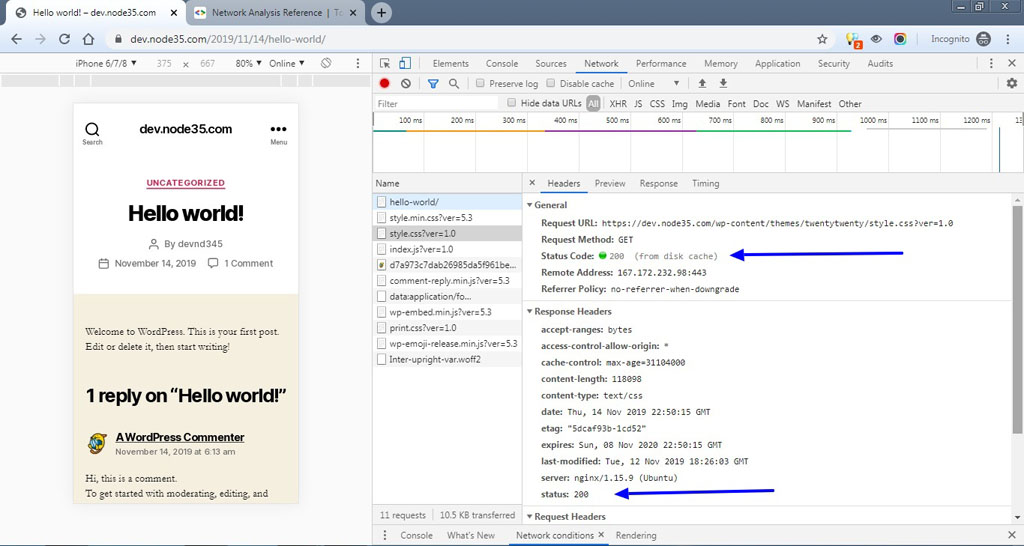
They only change listen port 80 (HTTP connection) to listen port 443 (SSL/HTTPS), configure SSL certificate settings on the Nginx serverblock, and add redirection settings from HTTP to HTTPS (removing HTTP access). You can see the following screenshot.
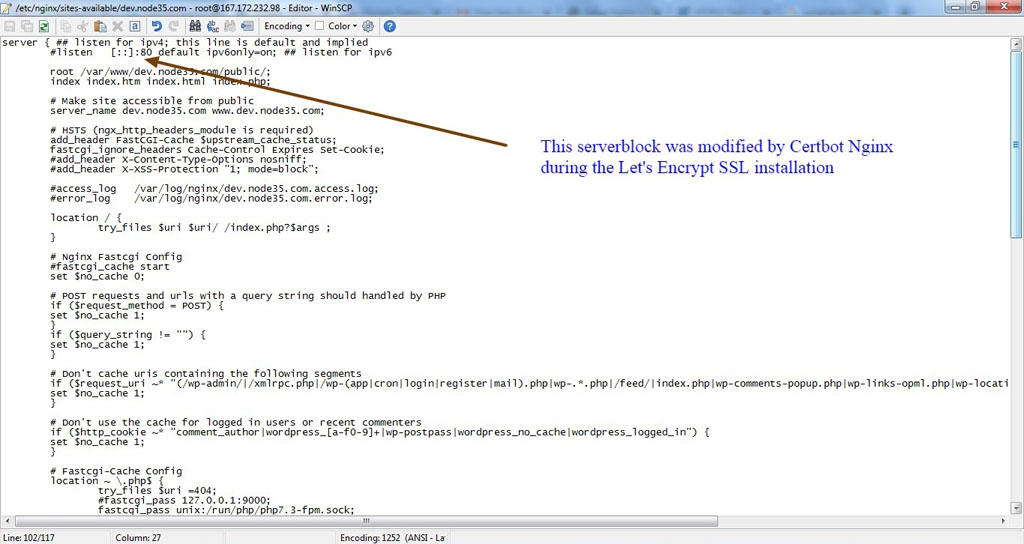
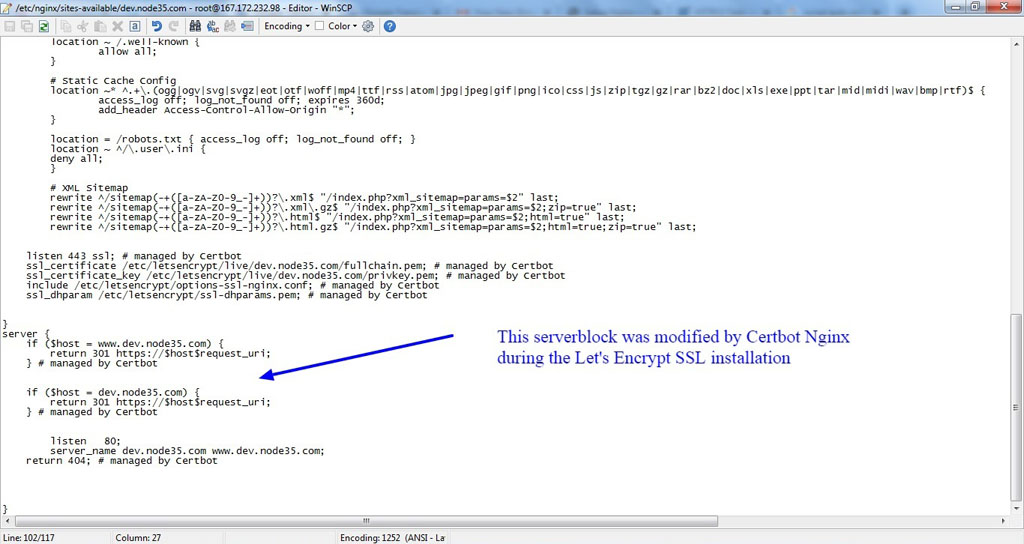
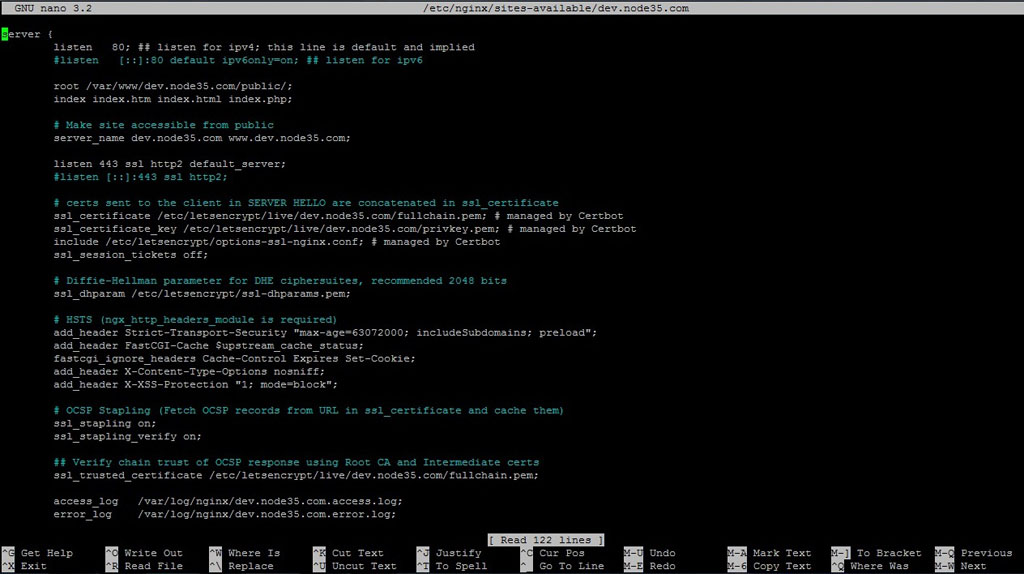
So we have to modify serverblock to make Nginx run in HTTP/2 protocol with Let’s Encrypt SSL.
Well, you can replace your current nginx serverblock with the following new serverblock to make your site run with the HTTP/2 Support.
$ nano /etc/nginx/sites-available/dev.node35.comserver {
listen 80; ## listen for ipv4; this line is default and implied
#listen [::]:80 default ipv6only=on; ## listen for ipv6
root /var/www/dev.node35.com/public/;
index index.htm index.html index.php;
# Servername directive
server_name dev.node35.com www.dev.node35.com;
# Make site run in HTTP/2 Network Protocol
listen 443 ssl http2 default_server;
#listen [::]:443 ssl http2;
# certs sent to the client in SERVER HELLO are concatenated in ssl_certificate
ssl_certificate /etc/letsencrypt/live/dev.node35.com/fullchain.pem; # managed by Certbot
ssl_certificate_key /etc/letsencrypt/live/dev.node35.com/privkey.pem; # managed by Certbot
include /etc/letsencrypt/options-ssl-nginx.conf; # managed by Certbot
ssl_session_tickets off;
# Diffie-Hellman parameter for DHE ciphersuites, recommended 2048 bits
ssl_dhparam /etc/letsencrypt/ssl-dhparams.pem;
# HSTS (ngx_http_headers_module is required)
add_header Strict-Transport-Security "max-age=63072000; includeSubdomains; preload";
add_header FastCGI-Cache $upstream_cache_status;
fastcgi_ignore_headers Cache-Control Expires Set-Cookie;
add_header X-Content-Type-Options nosniff;
add_header X-XSS-Protection "1; mode=block";
# OCSP Stapling (Fetch OCSP records from URL in ssl_certificate and cache them)
ssl_stapling on;
ssl_stapling_verify on;
## Verify chain trust of OCSP response using Root CA and Intermediate certs
ssl_trusted_certificate /etc/letsencrypt/live/dev.node35.com/fullchain.pem;
access_log /var/log/nginx/dev.node35.com.access.log;
error_log /var/log/nginx/dev.node35.com.error.log;
location / {
try_files $uri $uri/ /index.php?$args ;
}
# Nginx Fastcgi Config
#fastcgi_cache start
set $no_cache 0;
# POST requests and urls with a query string should handled by PHP
if ($request_method = POST) {
set $no_cache 1;
}
if ($query_string != "") {
set $no_cache 1;
}
# Don't cache uris containing the following segments
if ($request_uri ~* "(/wp-admin/|/xmlrpc.php|/wp-(app|cron|login|register|mail).php|wp-.*.php|/feed/|index.php|wp-comments-popup.php|wp-links-opml.php|wp-locations.php|sitemap(_index)?.xml|[a-z0-9_-]+-sitemap([0-9]+)?.xml)") {
set $no_cache 1;
}
# Don't use the cache for logged in users or recent commenters
if ($http_cookie ~* "comment_author|wordpress_[a-f0-9]+|wp-postpass|wordpress_no_cache|wordpress_logged_in") {
set $no_cache 1;
}
# Fastcgi-Cache Config
location ~ \.php$ {
try_files $uri =404;
#fastcgi_pass 127.0.0.1:9000;
fastcgi_pass unix:/run/php/php7.3-fpm.sock;
include fastcgi_params;
include fastcgi.conf;
fastcgi_param HTTP_PROXY "";
fastcgi_index index.php;
# fastcgi_intercept_errors on;
fastcgi_cache_bypass $no_cache;
fastcgi_no_cache $no_cache;
fastcgi_cache nodecache;
fastcgi_cache_valid 200 60m;
}
# Fastcgi-Purge Config
location ~ /purge(/.*) {
# Uncomment the following two lines to allow purge only from the webserver
#allow 127.0.0.1;
#deny all;
fastcgi_cache_purge nodecache "$scheme$request_method$host$1";
}
location ~ /.well-known {
allow all;
}
# Static Cache Config
location ~* ^.+\.(ogg|ogv|svg|svgz|eot|otf|woff|mp4|ttf|rss|atom|jpg|jpeg|gif|png|ico|css|js|zip|tgz|gz|rar|bz2|doc|xls|exe|ppt|tar|mid|midi|wav|bmp|rtf)$ {
access_log off; log_not_found off; expires 360d;
add_header Access-Control-Allow-Origin "*";
}
location = /robots.txt { access_log off; log_not_found off; }
location ~ ^/\.user\.ini {
deny all;
}
# XML Sitemap
rewrite ^/sitemap(-+([a-zA-Z0-9_-]+))?\.xml$ "/index.php?xml_sitemap=params=$2" last;
rewrite ^/sitemap(-+([a-zA-Z0-9_-]+))?\.xml\.gz$ "/index.php?xml_sitemap=params=$2;zip=true" last;
rewrite ^/sitemap(-+([a-zA-Z0-9_-]+))?\.html$ "/index.php?xml_sitemap=params=$2;html=true" last;
rewrite ^/sitemap(-+([a-zA-Z0-9_-]+))?\.html.gz$ "/index.php?xml_sitemap=params=$2;html=true;zip=true" last;
# Nginx HTTP/2 Module Configuration (ngx_http_v2_module)
#http2_recv_buffer_size 512k;
http2_body_preread_size 128k;
http2_chunk_size 16k;
http2_idle_timeout 5m;
http2_max_concurrent_streams 256;
http2_max_field_size 8k;
http2_max_header_size 32k;
http2_max_requests 1000;
http2_recv_timeout 60s;
}4. Test Nginx Configuration and Restart
nginx: the configuration file /etc/nginx/nginx.conf syntax is ok
nginx: configuration file /etc/nginx/nginx.conf test is successful
root@dev:~# service nginx restart
5. Verifying HTTP/2 Support
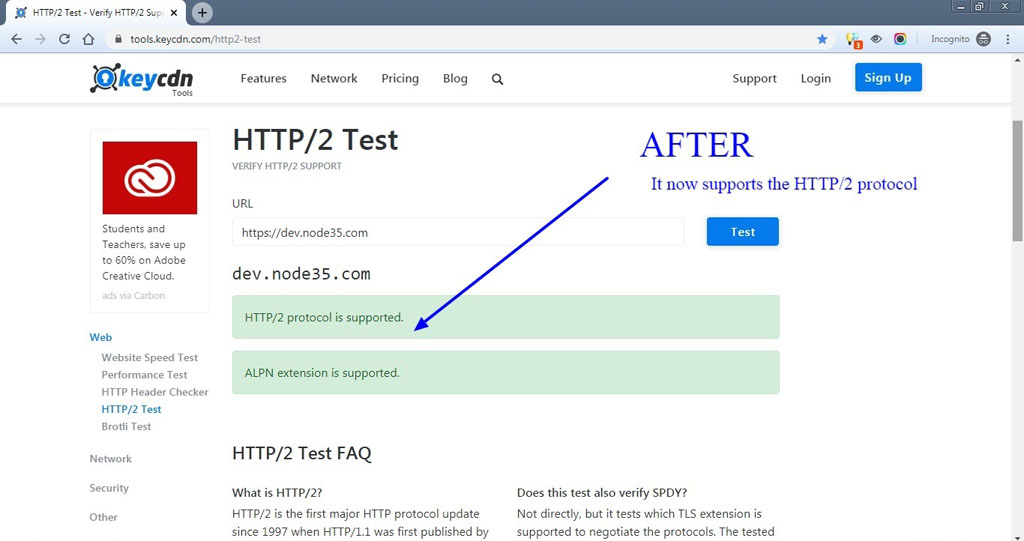
You can verify HTTP/2 support using the “HTTP/2 Test” tool provided by KeyCDN.
After testing, you will see whether your site supports HTTP/2 protocol or not. If your site already supports the HTTP/2 network protocol with Nginx, you will see results like this:
dev.node35.com
HTTP / 2 protocol is supported.
ALPN extension is supported.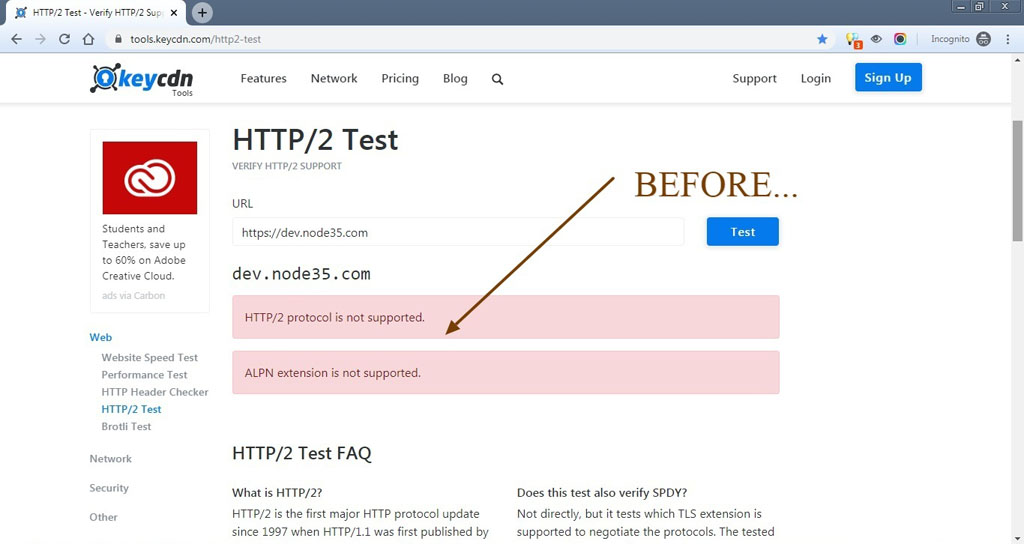
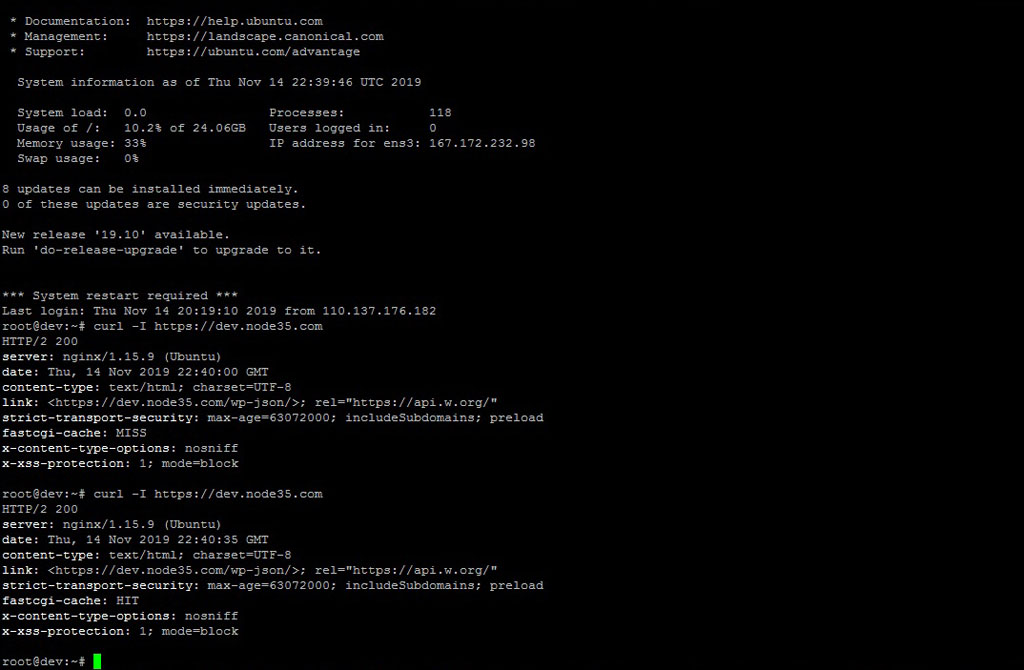
We can also test using the simple curl command in the SSH terminal. If you see the 200 response code, this means your website is already running on the Nginx web server with the HTTP/2 network protocol.
root@dev:~# curl -I https://dev.node35.com
HTTP/2 200
server: nginx/1.15.9 (Ubuntu)
date: Thu, 14 Nov 2019 22:40:35 GMT
content-type: text/html; charset=UTF-8
link: <https://dev.node35.com/wp-json/>; rel="https://api.w.org/"
strict-transport-security: max-age=63072000; includeSubdomains; preload
fastcgi-cache: HIT
x-content-type-options: nosniff
x-xss-protection: 1; mode=block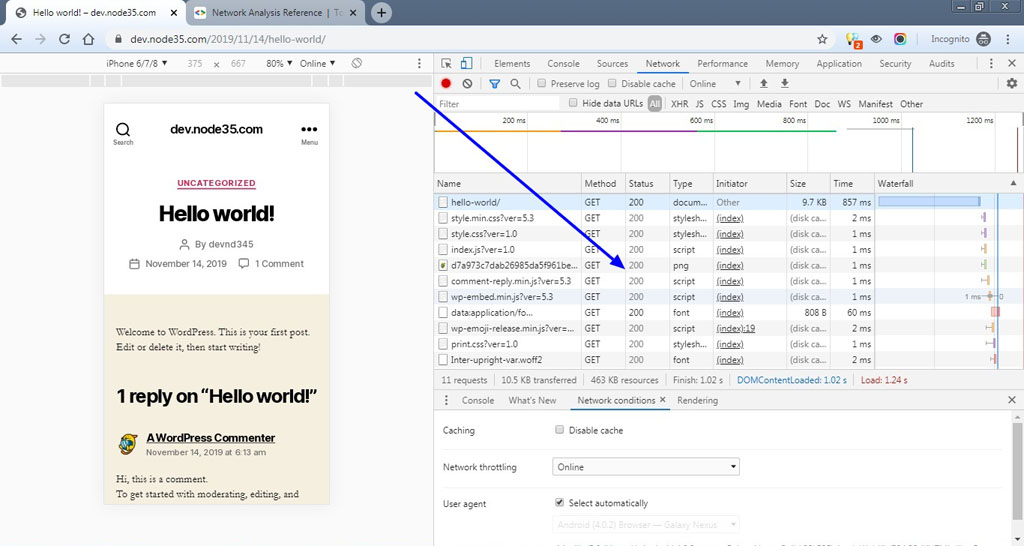

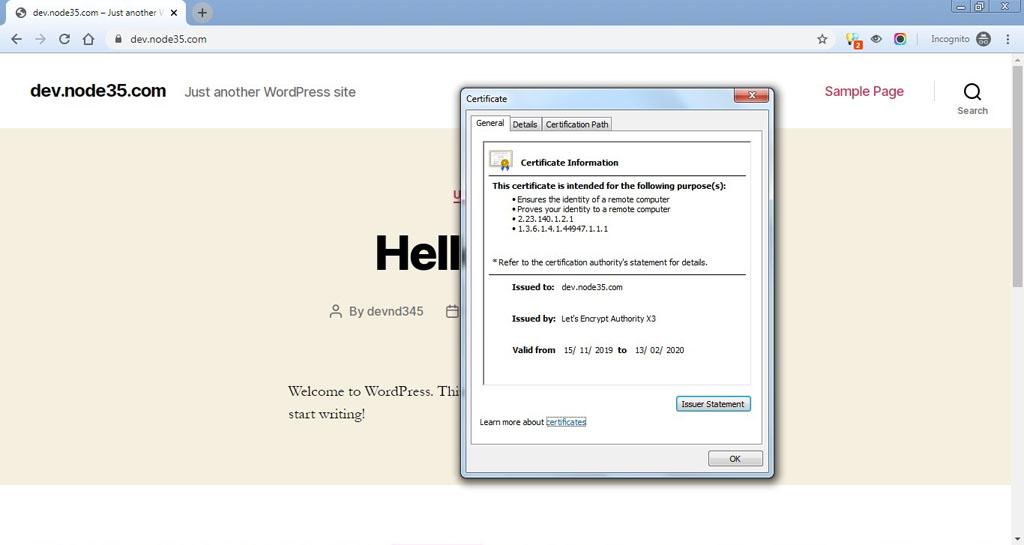
In addition, we can also test via Chrome browser to find out whether our site supports the HTTP / 2 protocol or not.
6. Test Auto-Renewal for Let’s Encrypt SSL
The Let’s Encrypt SSL certificate is valid for 90 days. However, the Certbot ACME client has set auto-renewal for Let’s Encrypt SSL every 12 hours.
You can check the crontab file located at /etc/cron.d/cerbot. In addition, we can also test the renewal process with the following dry-run certbot command:
$ certbot renew --dry-runWith the dry-run command, it will simulate certbot renew close to certificate expiry. If nothing goes wrong, you will see an output like this.
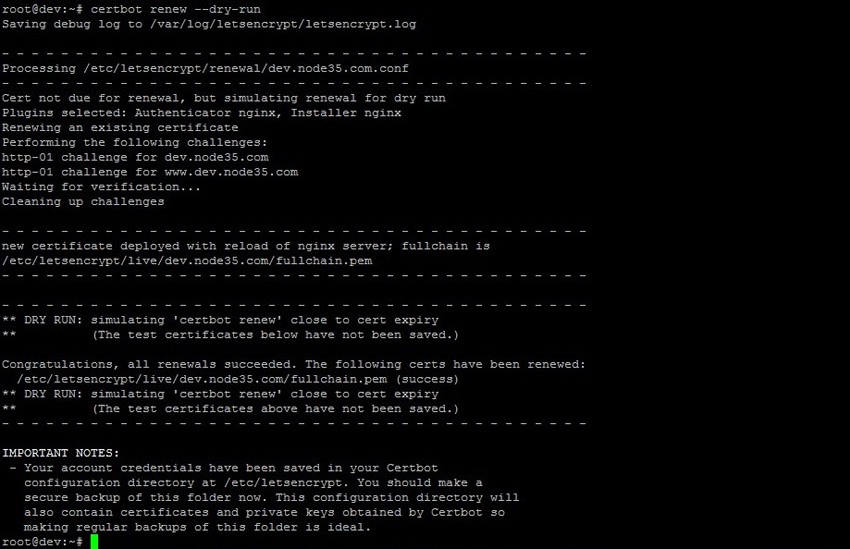
root@dev:~# certbot renew --dry-run
Saving debug log to /var/log/letsencrypt/letsencrypt.log

- - - - - - - - - - - - - - - - - - - - - - - - - - - - - - - - - - - - - - - -
Processing /etc/letsencrypt/renewal/dev.node35.com.conf
- - - - - - - - - - - - - - - - - - - - - - - - - - - - - - - - - - - - - - - -
Cert not due for renewal, but simulating renewal for dry run
Plugins selected: Authenticator nginx, Installer nginx
Renewing an existing certificate
Performing the following challenges:
http-01 challenge for dev.node35.com
http-01 challenge for www.dev.node35.com
Waiting for verification...
Cleaning up challenges

- - - - - - - - - - - - - - - - - - - - - - - - - - - - - - - - - - - - - - - -
new certificate deployed with reload of nginx server; fullchain is
/etc/letsencrypt/live/dev.node35.com/fullchain.pem
- - - - - - - - - - - - - - - - - - - - - - - - - - - - - - - - - - - - - - - -

- - - - - - - - - - - - - - - - - - - - - - - - - - - - - - - - - - - - - - - -
** DRY RUN: simulating 'certbot renew' close to cert expiry
**          (The test certificates below have not been saved.)

Congratulations, all renewals succeeded. The following certs have been renewed:
  /etc/letsencrypt/live/dev.node35.com/fullchain.pem (success)
** DRY RUN: simulating 'certbot renew' close to cert expiry
**          (The test certificates above have not been saved.)
- - - - - - - - - - - - - - - - - - - - - - - - - - - - - - - - - - - - - - - -

IMPORTANT NOTES:
 - Your account credentials have been saved in your Certbot
   configuration directory at /etc/letsencrypt. You should make a
   secure backup of this folder now. This configuration directory will
   also contain certificates and private keys obtained by Certbot so
   making regular backups of this folder is ideal.
root@dev:~#
We are a bunch of people who are still continue to learn Linux servers. Only high passion keeps pushing us to learn everything.