
Start your VPS now with FREE $100 credit.
CentOS is a versatile Linux distribution that allows you to install various applications, covering a lot of your needs. One of the niches that CentOS covers nicely is to be a server, particularly TFTP server.
What is TFTP, and how is it different from a regular FTP server?
TFTP, short for Trivial File System Protocol, is running in the UDP port 69, as opposed to FTP, which is running in TCP port 20 and 21. TFTP has a simpler command set (such as no LIST command to list file names, so you need to know the exact file name to download files from a TFTP server), less security, and is used a lot in embedded computing.
As an example of TFTP usage, Cisco routers and switches are using TFTP primarily to backup and restore configuration files and IOS images. TFTP is also used as a backbone for network booting, such as PXE and BOOTP. The lack of security built-in TFTP server makes it only suitable for local networks, as opposed to FTP, which can be used over the internet.
Installing tftp-server on CentOS 8 and later
The server application for TFTP is tftp-server. It can be installed through the terminal by issuing these following commands in CentOS 8 or later:
$ sudo dnf makecache
$ sudo dnf install tftp-server tftp -y
Ensure that the server is connected to the internet to allow it to download the latest tftp server packages.
After installation, the tftp service is created, with the following system socket file under /usr/lib/systemd/system:
$ /usr/lib/systemd/system/tftp.service
$ /usr/lib/systemd/system/tftp.socket
After the socket file is created, you need to rename them.
$ sudo cp /usr/lib/systemd/system/tftp.service
/etc/systemd/system/tftp-server.service
$ sudo cp /usr/lib/systemd/system/tftp.socket
/etc/systemd/system/tftp-server.socket
Before the FTP server is functional, we need to edit tftp-server.service. Issue the following command to the Terminal:
$ sudo nano /etc/systemd/system/tftp-server.serviceInitially, the file will look like this:
[Unit]
Description=Tftp Server
Requires=tftp.socket
Documentation=man:in.tftpd
[Service]
ExecStart=/usr/sbin/in.tftpd -s /var/lib/tftpboot
StandardInput=socket
[Install]
Also=tftp.socket
In the [Unit] section, replace the line Requires=tftp.socket with this line:
Requires=tftp-server.socketThen, replace the ExecStart line with this line:
ExecStart=/usr/sbin/in.tftpd -c -p -s /var/lib/tftpbootThe -c argument here allows for new files to be created, meanwhile the -p argument is passed to allow bypassing of additional permission check performed above the system-provided access controls.
The last argument, -s, is used to allow some form of security and compatibility for older boot ROMs. All three arguments are optional and can be removed if needed. In the configuration file, we also added the default upload/download location, which is set to /var/lib/tftpboot.
The directory could also be changed to your directory of choice. The last option to be set is the [Install] section. Replace the lines in the file with:
[Install]
WantedBy=multi-user.target
Also=tftp-server.socket
Ensure that the file looks like this before saving it:
[Unit]
Description=Tftp Server
Requires=tftp-server.socket
Documentation=man:in.tftpd
[Service]
ExecStart=/usr/sbin/in.tftpd -c -p -s /var/lib/tftpboot
StandardInput=socket
[Install]
WantedBy=multi-user.target
Also=tftp-server.socket
To start your tftp server, you need to reload the systemd daemon first with this following command:
$ sudo systemctl daemon-reloadAfter reloading, enable the server by issuing this command:
$ sudo systemctl enable --now tftp-serverThen, enable read and write access to the upload folder by using this command. Keep in mind that TFTP is inherently insecure, so you need to avoid connecting the server to the internet.
$ sudo chmod 777 /var/lib/tftpbootThe last step is to allow traffic to and from your TFTP server to the terminal with this following command:
$ sudo firewall-cmd --add-service=tftp –perm
$ sudo firewall-cmd --reload
Installing TFTP Server on CentOS 7 and earlier
The package manager of CentOS 7 is yum, which predates DNF. To install TFTP server on CentOS 7, we also need to install xinetd daemon. You can install both packages and all their dependencies by issuing this following command:
$ sudo yum install tftp tftp-server* xinetd*Then, you will need to edit the file /etc/xinetd/tftp to enable the service and file uploads if needed.
Issue this following command to the terminal:
$ sudo nano /etc/xinetd/tftp
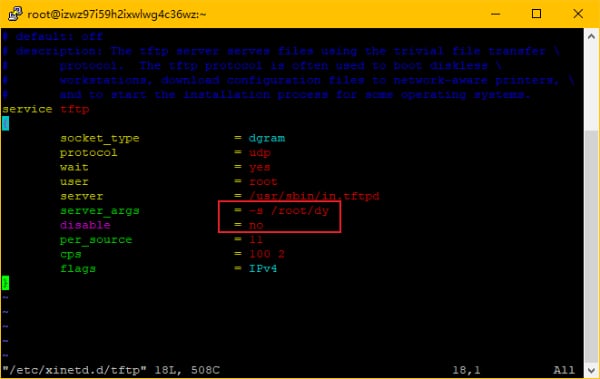
Then, edit the file to look like this:
service tftp
{
socket_type = dgram
protocol = udp
wait = yes
user = root
server = /usr/sbin/in.tftpd
server_args = -c -s /tftpboot
disable =no
per_source = 15
cps = 80 2
flags = IPv4
}Save the file, and enable xinetd and tftp with these following commands:
$ sudo systemctl enable xinetd
$ sudo systemctl enable tftp
Start both services by issuing these commands:
$ sudo systemctl start xinetd
$ sudo systemctl start tftp
Test the Server
Now that you have installed the server, you can try connecting to the server by issuing this following command from the client:
[client@client~ ]$ tftp ipaddress
tftp> verbose
Verbose mode on.
tftp> get server.logs
getting from 192.168.1.164:server.logs to server.logs [netascii]
Received 7 bytes in 0.0 seconds [inf bits/sec]
tftp> quit
[client@client:~ ]$
We are a bunch of people who are still continue to learn Linux servers. Only high passion keeps pushing us to learn everything.