
Start your VPS now with FREE $100 credit.
If you’re running NGINX web server inside your virtual machine, eg VPS, Cloud, Bare-Metal or Dedicated Server, you should have monitoring tools to perform monitoring system in your overall node system. Well, today we will guide you step by step on how to setting up, install and configure NGINX Amplify Agent on Debian 11 “bullseye”.
Before moving into the installation proccedure, we will let you know about what’s NGINX Amplify acutally. The Amplify is a compact monitoring application tools written in Python langguage, which have function to grab various system metrics, metadata, and then delivery it via secure connection into the backend system, both for storage and visualization data.
It’s similar to Netdata, Grafana and New Relic with collect various system metrics to perform monitoring system. NGINX Amplify can perform monitoring system and grab performance metrics for operating system, NGINX web server, NGINX Plus (Paid Version of Nginx open-source), PHP-FPM (PHP FastCGI-Process Manager), and MySQL database server.
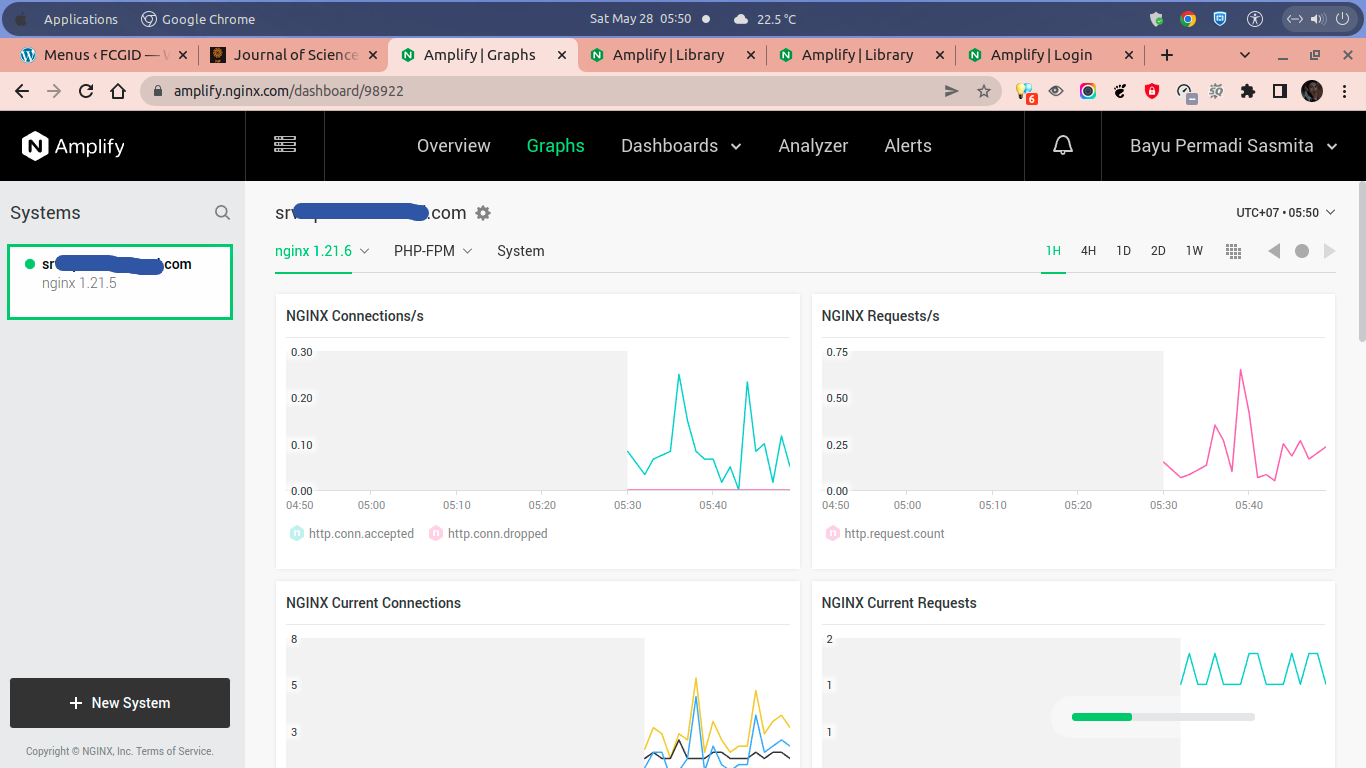
It make monitoring more easy for Nginx web server with out-of-the-box graphs. There are also available static analyzer for Nginx configuration, custom dashboard reports, SLA overview, automated alerts, and multi-user function. Another reporting tools also available, including HTTP status, response time, traffic, connections, and requests. User can also build their own graphs to view metrics data per virtual host, HTTP status, and URL.

Users can also setting up NGINX Amplify to detect several types of NGINX instances, including Nginx which are installed via official software repository, or Nginx built from source. User should setting up the Nginx Amplify Agent on all hosts or machine where they want to monitor it. Then Amplify will automatically start their program to send report metrics to provide real-time statistics in around 60 seconds in the NGINX Amplify web interface.
The Amplify Monitoring Agent can be installed in almost all Linux-based distribution system, including Ubuntu 18.04 “bionic” – 20.04 LTS “focal” (amd64/arm64), Debian 10 “buster” – 11 “bullseye” (amd64/arm64), Amazon Linux 2 LTS (amd64/arm64), and RHEL/CentOS/Oracle Linux 8+ (amd64/arm64). Make sure to meet the following requirenments before installing NGINX Amplify Agent.
PREREQUISITES:
* VPS, Cloud or Bare-Metal Server.
* Operating System with Debian-based or RHEL-based OS
* Server IPv4 Address with Superuser Privileges (Root Access)
* Gnome Terminal for Linux Desktop
* PuTTy SSH Client for Windows or Mac
* Powershell for Windows 10/11
* Familiar with DNF and YUM Commands
1.) Login to the VM via SSH Terminal
In the first step you must login into your machine with the following command. Make sure to replace server IPv4 address and its root password with your actual server IPv4 address and root password.
$ ssh [email protected] -p4322
[email protected]'s password:
Activate the web console with: systemctl enable --now cockpit.socket

Last login: Fri May 27 17:07:30 2022 from 125.164.234.150
2.) Install NGINX Amplify Agent
To monitor your system infrastructure you need to install the agent on each of your node system. Please note that Amplify Agent will drop root privileges access on machine startup. It means that Nginx Amplify will use a Nginx user ID to run their agent monitoring system, instead of use a root user. Simply run the following command to download and install NGINX Amplify using the Install Script:
$ curl -sS -L -O \
https://github.com/nginxinc/nginx-amplify-agent/raw/master/packages/install.sh && \
API_KEY='YOUR_API_KEY' sh ./install.sh
Then you can use the following command to verify that the Nginx Amplify was started successfully.
# ps ax | grep -i 'amplify\-'
2552 ? S 0:00 amplify-agent
3.) Install Amplify on Debian/Ubuntu OS
You can also install the Amplify Agent manually on Debian/Ubuntu-based distro using the following command. First of all, you must add the NGINX public key into your node:
* Using CURL command:
$ curl -fs http://nginx.org/keys/nginx_signing.key | apt-key add -
* Using WGET command:
$ wget -q -O - \
http://nginx.org/keys/nginx_signing.key | apt-key add -
* Configure Repository:
$ codename=`lsb_release -cs` && \
os=`lsb_release -is | tr '[:upper:]' '[:lower:]'` && \
echo "deb http://packages.amplify.nginx.com/${os}/ ${codename} amplify-agent" > \
/etc/apt/sources.list.d/nginx-amplify.list
* Verify the repository config file, e.g. for Debian 11 “bullseye”.
$ cat /etc/apt/sources.list.d/nginx-amplify.list
deb http://packages.amplify.nginx.com/debian/ bullseye amplify-agent
* Run system update the get the latest available packge or software from the repository.
$ apt-get update
* Install and run the NGINX Amplify agent installer.
$ apt-get install nginx-amplify-agent -y
4.) Command to Manage NGINX Amplify Agent
You can use one of the following commands to manage the Amplify Performance Monitoring Tools in your machine.
To Start Amplify Agent
$ service amplify-agent start
To Stop Amplify Agent
$ service amplify-agent stop
To Restart Amplify Agent
$ service amplify-agent restart
To Check Amplify Agent State
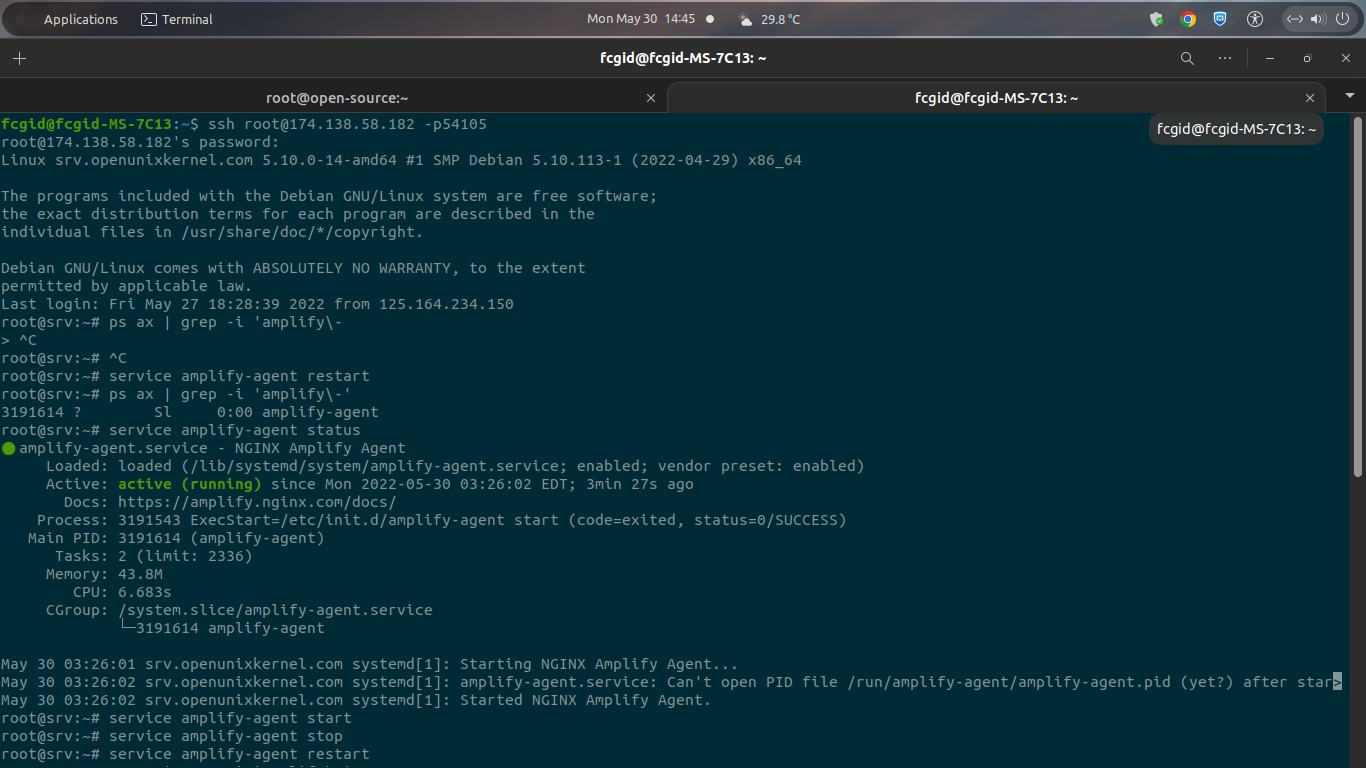
$ service amplify-agent status
● amplify-agent.service - NGINX Amplify Agent
Loaded: loaded (/lib/systemd/system/amplify-agent.service; enabled; vendor preset: enabled)
Active: active (running) since Mon 2022-05-30 03:26:02 EDT; 3min 27s ago
Docs: https://amplify.nginx.com/docs/
Process: 3191543 ExecStart=/etc/init.d/amplify-agent start (code=exited, status=0/SUCCESS)
Main PID: 3191614 (amplify-agent)
Tasks: 2 (limit: 2336)
Memory: 43.8M
CPU: 6.683s
CGroup: /system.slice/amplify-agent.service
└─3191614 amplify-agent

May 30 03:26:01 srv.openunixkernel.com systemd[1]: Starting NGINX Amplify Agent...
May 30 03:26:02 srv.openunixkernel.com systemd[1]: amplify-agent.service: Can't open PID file /run/amplify-agent/amplify-agent.pid (yet?) after star>
May 30 03:26:02 srv.openunixkernel.com systemd[1]: Started NGINX Amplify Agent.
lines 1-15/15 (END)
5.) Verify Amplify Agent
In the laste step you can verify that the Amplify Agent has started successfully using the following command.
$ ps ax | grep -i 'amplify\-'
3191614 ? Sl 0:00 amplify-agent
CONCLUSIONS:
You have successfully setting up the NGINX Amplify Agent on Debian 11 “bullseye”. You can also use this tutorial to install and configure in the another Debian-based distro, like Ubuntu 18.04 LTS “bionic beaver” and Ubuntu 20.04 LTS “focal fossa”. Then enjoy all free monitoring system, performance metrics data, and visualization reports with Amplify Monitoring Tools in your Debian 11 machine.
