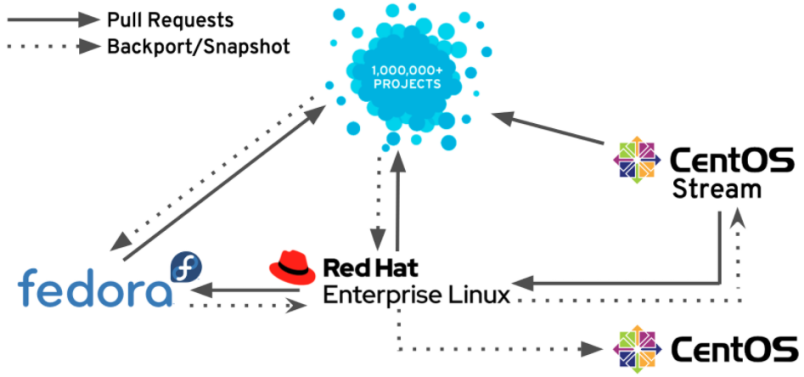
Rocky Linux is an free and open-source enterprise operating system which use the same binary and source codes with its upstream vendors, that’s Red Hat Enterprise Linux (RHEL). Curently Rocky Linux is actively developed, distributed and maintenanced by Rocky Enterprise Software Foundation and open-source community, which is designated as a successor and replacement for CentOS Linux or Community Enterprise Operating System.
Most importantly Rocky Linux is downstream, 100% bug-for-bug, and complete binary-compatible with RHEL operating system source code. It’s become community-supported project and production-grade enterprise operating system. For now there are three enterprise operating system for software development and cloud computing industry, including Red Hat Enterprise Linux, SUSE Linux Enterprise, and Rocky Linux.
Rocky Linux was firts introduced to the community and open-source software enthusiats as a release candidate version (RC) on April 30, 2021. After that Rocky Enterprise Software Foundation release a general availability version (GA) or long-term support stable release of Rocky Linux 8 on June 21, 2021 and it will still be actively supported, developed and maintenanced until May 2029.
As you know that since December 1 2003, CentOS Linux is a production-ready, binary-compatible, clone, and downstream version of Red Hat Enterprise Linux but without any Red Hat branding and logo. However, Red Hat have announced on December 8 2020 that they will discontinue and stop all development project for CentOS Linux. Then Red Hat move the project to CentOS Stream which is more intended only for upstream development versions of the Red Hat Enterprise Linux (RHEL).
Since Desember 1 2003, CentOS Linux is a production-ready, binary-compatible, clone, and downstream version of Red Hat Enterprise Linux but without any Red Hat branding and logo. However, Red Hat have announced on December 8 2020 that they discontinue and stop all development project for CentOS Linux. Then Red Hat move the project to CentOS Stream which is intented only for upstream development versions of Red Hat Enterprise Linux (RHEL), and it’s preview of a future version of RHEL.

Gregory Kurtzer, the original founder of CentOS, say that they start Rocky Linux Project to achieve the same goals as they have done in the past until CentOS Project stoped last year by Red Hat.
Well, today I will guide you on how to install, deploy, and configure Nginx web server, PHP-FPM, and MariaDB database server on Rocky Linux 8.5 or commonly called as a LEMP Stack. You can use default Rocky software repository which available on your system.
PREREQUISITES:
* VPS, Cloud, Bare Metal or Physical Servers
* Running under distro Rocky Linux 8.5
* Superuser Privileges or Root Access
* Must Be Familiar with Linux Command Line (CLI-Based Only)
* gNome Terminal for Linux Desktop
* PuTTy SSH Client for Windows and MacOS
* PowerShell for Windows 10/11
1.) Let’s Login to SSH Terminal
If you have buy a cloud server on some of four largest cloud computing provider like Google Cloud Platform (GCP), Amazon Web Services (AWS), Alibaba Cloud, or Microsoft Azure, just run the following command on your SSH terminal to login into your machine.
~# ssh root@server_IPv4_address -p22
NOTE: Default server use port 22
2.) Run System Update
For the firt time after you buy a cloud server you must run system update to update all software, packages, and repositories on your machine.
~# yum update
NOTE: You can use RHEL-based commands like “yum” or “dnf”
3.) Install Nginx Web Server Using Default Yum Repository (Stable Package)
After that we can continue to install and configure Nginx web server on your distribution system. There are two version of Nginx branches which can be installed on your machine, including stable or mainline release packages. Apart from that, you can also deploy Nginx using default software repository (local package) on your machine.
To Install Nginx using local package, simply run the following command. This will install Nginx stable branch on your machine.
~# yum install nginx -y
4.) Build Nginx Web Server from Source (Mainline Package)
However, if you want to build Nginx mainline package on your Rocky machine you can use official Nginx repository for RHEL/CentOS Linux, simply follow this step. Just for info, Nginx mainline branch is more stable, reliable, bundled with the latest features, and getting more frequently updates and major bugfixes rather than stable package of Nginx web server which having only minor bug fixes for its future version.

Well, on this step we will install Nginx mainline package from the source. But, before doing that, make sure to add Nginx mainline repository from the Official Nginx website. Currently “nginx-1.21.6” is a latest mainline version of Nginx web server which was released on January 25 2022.
Let’s install the prerequisites firts:
~# yum install yum-utils
Then you need to create yum repository for Nginx mainline package called “nginx.repo” and put this file under directory of /etc/yum.repos.d/nginx.repo. Kindly paste the following snippet code into “nginx.repo” file.
[nginx-mainline]
name=nginx mainline repo
baseurl=http://nginx.org/packages/mainline/centos/$releasever/$basearch/
gpgcheck=1
enabled=1
gpgkey=https://nginx.org/keys/nginx_signing.key
module_hotfixes=true
After you have create file nginx.repo under /etc/yum.repos.d/ directory you should run system update on your machine or enable nginx mainline package with the following command.
~# yum update
~# yum-config-manager --enable nginx-mainline
Next, install Nginx mainline package using this simple command:
~# yum install nginx
Let’s enable and start Nginx web server via SSH terminal on your machine.
~# systemctl enable nginx.service
~# systemctl start nginx.service
5.) Install PHP-FPM – The Latest Stable Release of PHP 8.1 with FastCGI Process Manager)
After your system have running Nginx web server, either it stable or mainline version, you can continue to the next step to install and configure PHP 8.1 with FastCGI Process Manager a.k.a PHP-FPM. Make sure to add both EPEL and REMI software repository on your virtual machine.
Install EPEL Repository:
~# dnf install https://dl.fedoraproject.org/pub/epel/epel-release-latest-8.noarch.rpm

~# rpm -qa | grep epel
Install REMI Repository:
~# dnf install https://rpms.remirepo.net/enterprise/remi-release-8.rpm

~# rpm -qa | grep remi
Then list available PHP modules using the following commands.
~# dnf module list php
After that we must enable REMI repository for PHP 8.1, kindly run the following command.
~# dnf module enable php:remi-8.1

~# dnf install php-fpm php php-bcmath php-cli php-common php-gd php-imap php-mbstring php-mcrypt php-mysql php-mysqlnd php-pdo php-soap php-tidy php-xml php-xmlrpc php-opcache php-redis php-pecl-mcrypt php-brotli
Well, from this step PHP 8.1 with FastCGI Process Manager (PHP81-FPM) have been successfully installed on your machine and you just need run these command to enable and start PHP-FPM. You can also verify what version of PHP which you have installed on your machine.
~# systemctl enable php-fpm.service
~# systemctl start php-fpm.service
~# php -v
6.) Lastly, Install MariaDB Database Server
By default, Rocky Linux is shipped with MariaDB 10.3 database server on their AppStream repository. Kindly run the following command to install MariaDB 10.3 on your machine.
~# yum install mariadb-server
Then let’s enable, start and verify MariaDB service with the following commands.
~# systemctl enable mariadb.service

~# systemctl start mariadb.service

~# mysql -V
However, don’t forget to create a secure environment for your MariaDB Installation. So, we need to securing and hardening the MariaDB 10.3 database server which have been installed on your system. It’s makes difficult for attackers to break into your Relational Database Management System.
Kindly run the following command to secure your MariaDB database server. Don’t forget to set up MySQL root password on the prompt screen. Just press ENTER if asked to input MySQL Root Password, since you have not previously setting up MySQL root password.
~# secure_mysql_installation
OK, WELL DONE… You have successfully deploy LEMP Stack (Install and Configure Linux, Nginx, MariaDB and PHP-FPM) on Rocky Linux 8.5 machine. You can apply this guide, either on development or production server.


