
Start your VPS now with FREE $100 credit.
Today we will guide you on how to install and configure Jenkins on Ubuntu 20.04 LTS (Focal Fossa). Jenkins is known as a leading open-source automation server and provides hundreds of plugin to support building, deploying and automating any application project. Jenkins is written in Java programming language which facilitates Continuous Integration and Continuous Delivery for software development a.k.a CI/CD in DevOps environments. The current latest stable release of Jenkins is version 2.337 which was released in 1 March 2022 or 48 days ago. It was first introduced by Kohsuke Kawaguchi as Original author of Jenkins in 2 February 2011, under MIT License.
The developer at Jenkins provide Easy Installation methods on various software, container and operating system. It’s basically a self-contained Java-based program which can run out-of-the-box on various operating system like Linux, Windows, and MacOS. You can easily install and configure Jenkins via its web interface, featuring auto error checks and built-in help.
There are also hundreds of plugins in the Update Center which support Jenkins and integrate it with practically every tool in the CI/CD toolchain. Apart from that, you can easily distribute Jenkins to work across multiple machines. It will help the engineer to speed up in building, testing and deploying their software across multiple platform quickly than ever. We can also extended Jenkins via its plugin architecture which provide nearly infinite possibilities for what Jenkins can do on your ecosystem.
Jenkins is usually can run as a standalone application on its own process with built-in Java servlet container or application server (Jetty). In addition, Jenkins can also work and run smoothly as a server-based system or servlet in different Java servlet containers like Apache Tomcat or GlassFish. Jenkins supports various version control tools system like Subversion, Git, Mercurial, AccuRev, CVS, and Apache Maven.
You can also use Jenkins as a simple CI server or even change it into the continuous delivery hub to support any project. So we can build great things at any scale with Jenkins. Well, before installing Jenkins on your Linux machine, make sure to meet the following requirenment.
PREREQUISITES:
* VPS, Cloud, or Bare-Metal Server
* Laptop or Desktop PC if you want to run Jenkins on Localhost
* Running under Operating System Ubuntu 20.04 LTS (Focal Fossa)
* Server IPv4 Address with Superuser Privileges (Root Access)
* Gnome Terminal for Linux Desktop
* PuTTy SSH Client for Windows or Mac
* Powershell for Windows 10/11
* Minimum hardware requirements:
** RAM/Memory: 256 MB
** HDD (Storage Space): 1 GB or 10 GB if running Jenkins as a Docker container
* Recommended hardware configuration for a small team:
** RAM/Memory: 4 GB+
** HDD (Storage Space): 50 GB+
1.) Add Debian Stable Repository
Jenkins installers are available on almost all Linux-based operating system, including Debian/Ubuntu-based distros, Fedora, RedHat and its derivative like CentOS. On Debian/Ubuntu-based distributions you can install Jenkins via apt command.
Login as ROOT with superuser privileges and then run the following command:
$ sudo su
[sudo] password for fcgid:
Move to root directory:
$ cd /root
Then, let’s adding the following debian-stable apt repository into your Linux machine.
curl -fsSL https://pkg.jenkins.io/debian-stable/jenkins.io.key | sudo tee \
/usr/share/keyrings/jenkins-keyring.asc > /dev/null
echo deb [signed-by=/usr/share/keyrings/jenkins-keyring.asc] \
https://pkg.jenkins.io/debian-stable binary/ | sudo tee \
/etc/apt/sources.list.d/jenkins.list > /dev/null
2.) Install Jenkins LTS (Long-Term Support) release
Next, we will stick only on Jenkins LTS and choose to install it from this step. Instead of use Weekly release that is released weekly to provide bug fixes, new features to the users and plugin developers. Jenkins LTS is chosen every 12 weeks from the stream of regular releases as the stable release during that time period. You can install it using debian-stable apt repository.

After adding debian-stable apt repository into your Linux machine, don’t forget to run system update in order to get the latest stable available packages and softwares from the official OS vendor.
$ apt update
Then run this command to install Jenkins LTS.
$ apt install jenkins
Then check Jenkins version on terminal using this command.
$ jenkins version
Running from: /usr/share/java/jenkins.war
webroot: $user.home/.jenkins
2022-04-29 08:19:23.618+0000 [id=1] INFO org.eclipse.jetty.util.log.Log#initialized: Logging initialized @244ms to org.eclipse.jetty.util.log.JavaUtilLog
2022-04-29 08:19:23.672+0000 [id=1] INFO winstone.Logger#logInternal: Beginning extraction from war file
2022-04-29 08:19:24.395+0000 [id=1] WARNING o.e.j.s.handler.ContextHandler#setContextPath: Empty contextPath
2022-04-29 08:19:24.433+0000 [id=1] INFO org.eclipse.jetty.server.Server#doStart: jetty-9.4.43.v20210629; built: 2021-06-30T11:07:22.254Z; git: 526006ecfa3af7f1a27ef3a288e2bef7ea9dd7e8; jvm 11.0.15+10-Ubuntu-0ubuntu0.20.04.1
2022-04-29 08:19:24.609+0000 [id=1] INFO o.e.j.w.StandardDescriptorProcessor#visitServlet: NO JSP Support for /, did not find org.eclipse.jetty.jsp.JettyJspServlet
2022-04-29 08:19:24.637+0000 [id=1] INFO o.e.j.s.s.DefaultSessionIdManager#doStart: DefaultSessionIdManager workerName=node0
2022-04-29 08:19:24.637+0000 [id=1] INFO o.e.j.s.s.DefaultSessionIdManager#doStart: No SessionScavenger set, using defaults
2022-04-29 08:19:24.638+0000 [id=1] INFO o.e.j.server.session.HouseKeeper#startScavenging: node0 Scavenging every 660000ms
2022-04-29 08:19:24.902+0000 [id=1] INFO hudson.WebAppMain#contextInitialized: Jenkins home directory: /root/.jenkins found at: $user.home/.jenkins
2022-04-29 08:19:25.047+0000 [id=1] INFO o.e.j.s.handler.ContextHandler#doStart: Started w.@a20b94b{Jenkins v2.332.2,/,file:///root/.jenkins/war/,AVAILABLE}{/root/.jenkins/war}
3.) Install Java
In order to run Jenkins on your Linux machine you must install Java, since Jenkins requires Java to work and run on your machine. Currently only Java 8 and Java 11 are supported and required for running modern versions of Jenkins. Please note that currently all other Java versions are not supported or incompatible with Jenkins like Java 7, 9, 10, 12, 13, 14, 15, and 16.
OpenJDK is the most popular Java implementations at this time and you can implement it as well on your Linux machine. Jenkins project have performs a full test flow with the following JDK/JREs versions:
* OpenJDK JDK / JRE 8 - 64 bits
* OpenJDK JDK / JRE 11 - 64 bits
These prerequisites apply to all components of the Jenkins system, whihc include Jenkins controller, CLI clients, all agents types, and another components. Let’s install OpenJDK 11 after updating the Debian apt repository using the following commands.
$ apt update
$ apt install openjdk-11-jre
$ java -version
openjdk version "11.0.15" 2022-04-19
OpenJDK Runtime Environment (build 11.0.15+10-Ubuntu-0ubuntu0.20.04.1)
OpenJDK 64-Bit Server VM (build 11.0.15+10-Ubuntu-0ubuntu0.20.04.1, mixed mode, sharing)
4.) Manage Jenkins Server
After that you can manage your Jenkins Server, including Start, Stop, Restart, and Check Status. Simply using the following commands.
Enable Jenkins Service to Start from Boot.
$ systemctl enable jenkins
Synchronizing state of jenkins.service with SysV service script with /lib/systemd/systemd-sysv-install.
Executing: /lib/systemd/systemd-sysv-install enable jenkins
To Start Jenkins Service
$ systemctl start jenkins
To Stop Jenkins Service
$ systemctl stop jenkins
To Restart Jenkins Service
$ systemctl restart jenkins
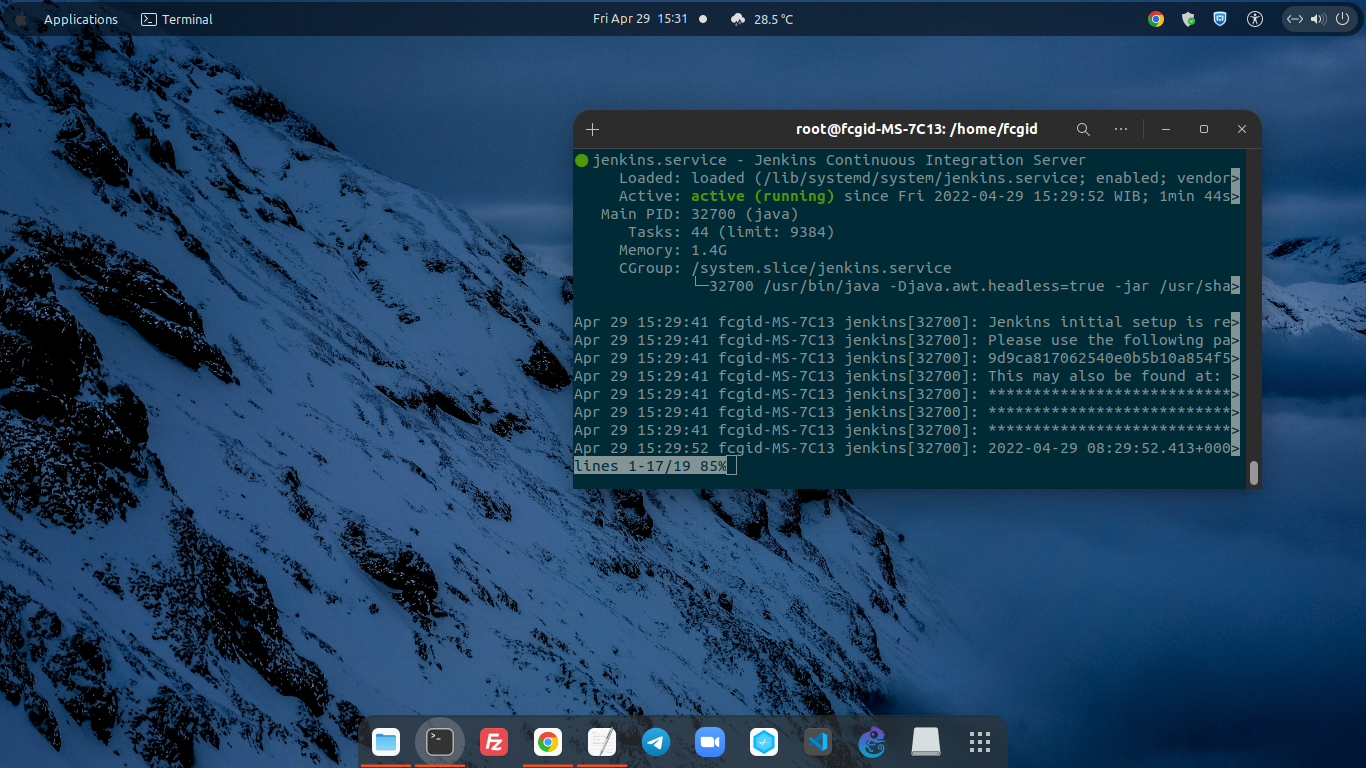
Check Status of the Jenkins Service
$ systemctl status jenkins
● jenkins.service - Jenkins Continuous Integration Server
Loaded: loaded (/lib/systemd/system/jenkins.service; enabled; vendor preset: enabled)
Active: active (running) since Fri 2022-04-29 15:29:52 WIB; 22s ago
Main PID: 32700 (java)
Tasks: 52 (limit: 9384)
Memory: 1.4G
CGroup: /system.slice/jenkins.service
└─32700 /usr/bin/java -Djava.awt.headless=true -jar /usr/share/java/jenkins.war --webroot=/var/cache/jenkins/war --httpPort=8080

Apr 29 15:29:41 fcgid-MS-7C13 jenkins[32700]: Jenkins initial setup is required. An admin user has been created and a password generated.
Apr 29 15:29:41 fcgid-MS-7C13 jenkins[32700]: Please use the following password to proceed to installation:
Apr 29 15:29:41 fcgid-MS-7C13 jenkins[32700]: 9d9ca817062540e0b5b10a854f54eb8c
Apr 29 15:29:41 fcgid-MS-7C13 jenkins[32700]: This may also be found at: /var/lib/jenkins/secrets/initialAdminPassword
Apr 29 15:29:41 fcgid-MS-7C13 jenkins[32700]: *************************************************************
Apr 29 15:29:41 fcgid-MS-7C13 jenkins[32700]: *************************************************************
Apr 29 15:29:41 fcgid-MS-7C13 jenkins[32700]: *************************************************************
Apr 29 15:29:52 fcgid-MS-7C13 jenkins[32700]: 2022-04-29 08:29:52.413+0000 [id=31] INFO jenkins.InitReactorRunner$1#onAttained: Comple>
Apr 29 15:29:52 fcgid-MS-7C13 jenkins[32700]: 2022-04-29 08:29:52.424+0000 [id=23] INFO hudson.lifecycle.Lifecycle#onReady: Jenkins is>
Apr 29 15:29:52 fcgid-MS-7C13 systemd[1]: Started Jenkins Continuous Integration Server.
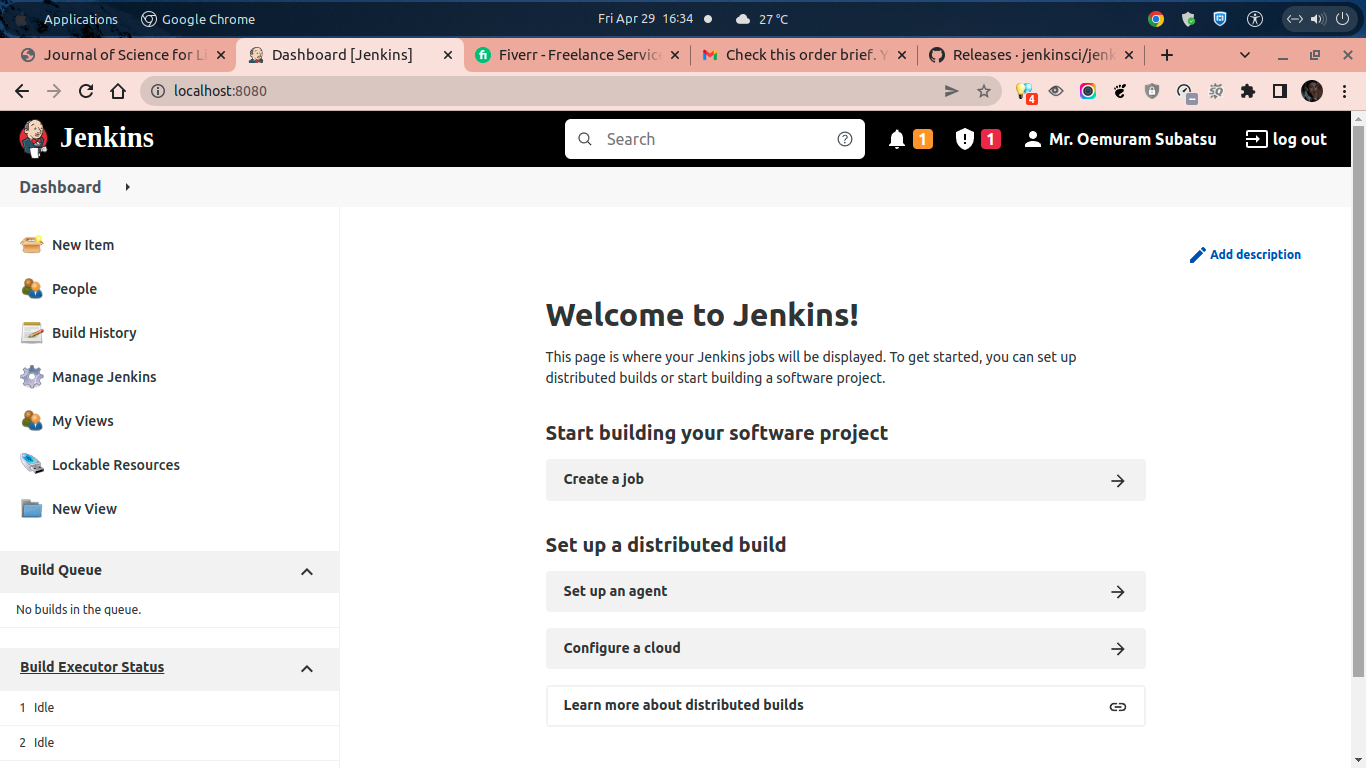
5.) Access Jenkins Server via Web Browser
Next, you need to access Jenkins via web browser like Chrome or Firefox to finish the Jenkins configurations. Jenkins server is listen on TCP port 8080 by default, so make sure you have add or whitelisted this port on your Firewall rule.
* Jenkins URL: http://localhost:8080/
Or if you run Jenkins on VPS, Cloud or Bare-Metal server you can access via:
* Jenkins URL: http://server_IPv4_address:8080/
6.) Unlock Jenkins
Jenkins have ben securely set up by the administrator, that’s whay the Jenkins administrator password is written into the log file “initialAdminPassword”. Simply run this command on your terminal to copy and paste the administrator password.
$ tail -f /var/lib/jenkins/secrets/initialAdminPassword
9d9ca817062540e0b5b10a854f54eb8c
PLEASE NOTE: Make sure to change 9d9ca817062540e0b5b10a854f54eb8c with your actual initialAdminPassword.

7.) Install Sugested Plugin for Jenkins
On the Getting Started and Customize Jenkins pages, you can install the most useful and sugested plugins to extend Jenkins with extra features to support many different needs.
8.) Create First Admin User
Then you can continue to create first admin user on your Jenkins Server, and make sure to fill with the correct data on the columns like Username, Password: Confirm password, Full name and E-mail address. After that click Save and Continue.
9.) Instance Configuration
Jenkins URL: http://localhost:8080/
The Jenkins URL providing the root URL for absolute links which is used to the various Jenkins resources. Kindly press “Save and Finish” on Instance Configuration step, and then you can start using Jenkins.
CONCLUSION:
Your Jenkins Server setup on Ubuntu 20.04 LTS machine is now complete and it’s ready to use. You can now build, deploy and automate any application project or software development using Jenkins.
