
Start your VPS now with FREE $100 credit.
In today’s guide we will teach you on how to install Kubernetes on Red Hat Enterprise Linux 8.5 (RHEL). So, before we moving forward to the next level, we will ask you the fundamental principle about what is Kubernetes actually? Let me describe to you about the Kubernetes and what the Kubernetes can do on your node system.
Kubernetes or also called K8s is an free and open-source platform which was originally created and developed by Google not only for automated deployent of containerized applications, but can also scaling and manage it. Kubernetes it’s actualy a group of container that deploy an application into logical units, which make it easy for developer to manage and discover their containerized apps. It was firts introduced by Google in June 7, 2014 or 7 years ago. Kubernetes is written in Go language with type of a Cluster management software and it’s released under Apache License 2.0. Currently the latest stable release of Kubernetes is version 1.23.1, which was released on December 16, 2021 / 4 months ago).
And the fact is that Kubernetes was build upon based on 15 years of Google experience on the running production infracstructure with heavy workloads. It also utilize the best ideas from Google employees along with the open-source software community. As we know that Google has a huge data center infrastructure, and it’s probably the biggest infrastructure ever in the world. Making it impossible for Google to run their infrastructure without automating it. Currently Kubernetes project is maintenanced by Cloud Native Computing Foundation.
As an free, open-source container orchestration system for automating software deployment, scaling, and management, Kuberntes have been used for a long time by some big companies in the world like Google, Microsoft, Amazon, IBM, Red Hat, Oracle, SUSE, VMware and Platform9. All those big companies offer Kubernetes as a Iaas product a.k.a Infrastructure as a service. So if you want to automate your software or applications deployment, you can try Iaas on those companies.
Before installing and configuring Kubernetes on your RHEL 8.5 machine, make sure to meet the following requirenment. Without meet the following requirenment you can not run Kubernetes on your machine.
PREREQUISITES:
* VPS, Cloud, or Bare-Metal Server
* Laptop or Desktop PC if you want to run K8s Locally
* Running under Operating System Red Hat Enterprise Linux 8.5 (RHEL)
* Server IPv4 Address with Superuser Privileges (Root Access)
* Gnome Terminal for Linux Desktop with GUI
* PuTTy SSH Client for Windows or Mac
* Powershell for Windows 10/11
* Familiar with DNF and YUM Commands
1.) Install Kubernetes on Learning Environment
There are actualy two ways to bring Kubernetes into your machine, including install kubectl binary with “curl” or install it using a Native Package Management System on Linux, either it running under Debian-based distros or Red Hat derivatives like CentOS, Fedora, Rocky Linux and AlmaLinux OS.
Please note that you must at least run a kubectl version that have one differnce minor version from your cluster. That’s to avoid or minimize issues or conflict as small as possible. In the practice that kubectl client v1.23 can smothly communicate with kubectl version 1.24, 1.23 and 1.22. So it’s highly recomended to use the latest stable release and compatible version of kubectl, rather than using uncompatible version of kubectl with your Kubernetes cluster.
A.) Install Kubectl using Native Package Management System
Let’s create a file called “kubernetes.repo” under directory of /etc/yum.repos.d on your Red Hat machine. Simply run the following command.
cat <<EOF | sudo tee /etc/yum.repos.d/kubernetes.repo
[kubernetes]
name=Kubernetes
baseurl=https://packages.cloud.google.com/yum/repos/kubernetes-el7-x86_64
enabled=1
gpgcheck=1
repo_gpgcheck=1
gpgkey=https://packages.cloud.google.com/yum/doc/yum-key.gpg https://packages.cloud.google.com/yum/doc/rpm-package-key.gpg
EOF
After that kindly install kubectl with the following command.
$ sudo yum install -y kubectl

B.) Install Kubectl on RHEL 8.5 with CURL Command.
Apart from that, you can also install kubectl with CURL command. Simply run the following curl command to download the latest release package of kubectl.
$ curl -LO "https://dl.k8s.io/release/$(curl -L -s https://dl.k8s.io/release/stable.txt)/bin/linux/amd64/kubectl"
C.) Validate Binary and Download Kubectl Checksum file.
$ curl -LO "https://dl.k8s.io/$(curl -L -s https://dl.k8s.io/release/stable.txt)/bin/linux/amd64/kubectl.sha256"
D.) Next, let’s validate the Kubectl binary against its checksum file using the following command.
echo "$(cat kubectl.sha256) kubectl" | sha256sum --check
The output as follow if it’s okay.
kubectl: OK
However, it the kubectl binary validation to the checksum file is failed, you will get the error respon code “sha256 exits with nonzero status” as follow.
kubectl: FAILED
sha256sum: WARNING: 1 computed checksum did NOT match
E.) Let’s Install Kubectl using CURL
After that, simply run the following command to install kubectl using curl command on Red Hat EL 8.5.
$ sudo install -o root -g root -m 0755 kubectl /usr/local/bin/kubectl
F.) Install Kubectl without Superuser Privileges (Non-Root Access)
So this is important to know if we don’t have root access, where the cloud provider are not willing to give you superuser privileges to the entire system. Just sit back and calm down, because we can still install kubectl to the ~/.local/bin directory. Simply run the following command.
$ chmod +x kubectl
$ mkdir -p ~/.local/bin
$ mv ./kubectl ~/.local/bin/kubectl
# and then append (or prepend) ~/.local/bin to $PATH
G.) Let’s Test and Check the Kubectl Versions
It’s must be done in your end to ensure that the kubectl version you have installed is up-to-date.
$ kubectl version --client
Or simply run the following command to print detailed view of your kubectl version.
$ kubectl version --client --output=yaml
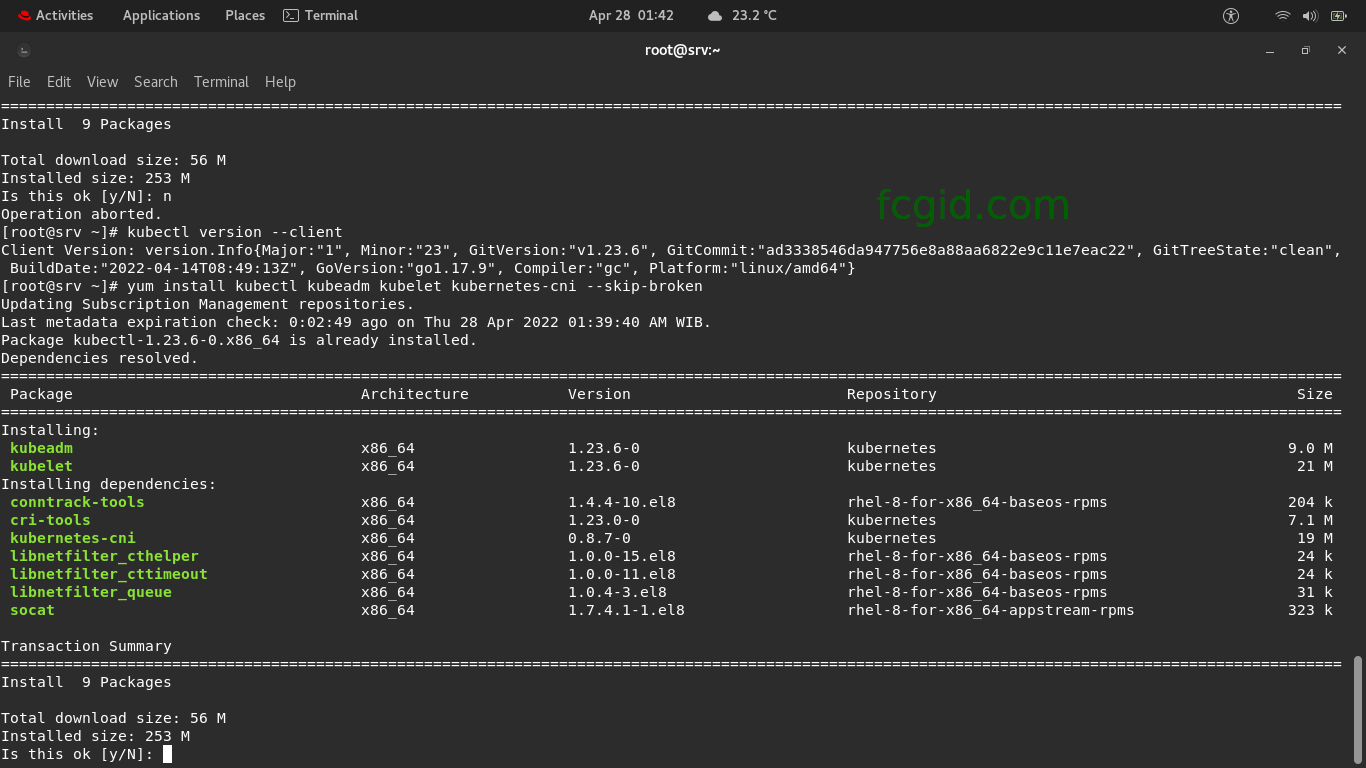
2.) Install Kubernetes Cluster on Production Environment
Apart from above methods, we can also installing and configuring Kubernetes on production environment. We need some of these extra deployment tools to bring Kubernetes Cluster work on production stack. Simply run the following command.
$ yum install kubectl kubeadm kubelet kubernetes-cni --skip-broken
3.) Install Minikube to run a Kubernetes Cluster Locally (Laptop or Desktop PC)
From this step, we need a tool called Minikube to run a Kubernetes Cluster locally or run it on localhost, eg laptop and desktop PC. Simply run the following command to install the latest stable release of Minikube on Red Hat Enterprise Linux 8.5 (RHEL) x86-64 architecture using RPM package.
$ curl -LO https://storage.googleapis.com/minikube/releases/latest/minikube-latest.x86_64.rpm
% Total % Received % Xferd Average Speed Time Time Time Current
Dload Upload Total Spent Left Speed
100 15.6M 100 15.6M 0 0 2174k 0 0:00:07 0:00:07 --:--:-- 2421k
$ sudo rpm -Uvh minikube-latest.x86_64.rpm
Verifying... ################################# [100%]
Preparing... ################################# [100%]
Updating / installing...
1:minikube-1.25.2-0 ################################# [100%]
4.) Using Minikube with Docker as a Container-Based Driver
You can configuring various minikube drivers on your local machine. Since minikube can be deployed and configured as a bare-metal server, container or virtual machine (VM). However, it’s strongly recomended to use Minikube with Dockers as a driver, considering that the Docker Machine library can provide a consistent performance while interacting in different environments.
A.) Check Docker Status
Before using Minikube with Docker Driver, make sure Docker (docker.service) is active and running. You can verify and check status of the docker.service using the following.
$ systemctl status docker.service
● docker.service - Docker Application Container Engine
Loaded: loaded (/usr/lib/systemd/system/docker.service; disabled; vendor preset: disabled)
Active: inactive (dead)
Docs: https://docs.docker.com
B.) Start Docker Engine
The response status above (section A) indicates that docker.service is inactive or not running properly, maybe disabled or not started properly. So let’s start Docker Engine (docker.service) using the following command.
$ systemctl start docker.service
C.) Enable Docker Engine to Start from Boot
$ systemctl enable docker.service
Created symlink /etc/systemd/system/multi-user.target.wants/docker.service → /usr/lib/systemd/system/docker.service.
D.) Check Again Docker Status
After that you can check again the Docker status on your RHEL machine.
$ systemctl status docker.service
● docker.service - Docker Application Container Engine
Loaded: loaded (/usr/lib/systemd/system/docker.service; disabled; vendor preset: disabled)
Active: active (running) since Thu 2022-04-28 03:18:02 WIB; 6min ago
Docs: https://docs.docker.com
Main PID: 58753 (dockerd)
Tasks: 8
Memory: 48.2M
CGroup: /system.slice/docker.service
└─58753 /usr/bin/dockerd -H fd:// --containerd=/run/containerd/containerd.sock

Apr 28 03:17:11 srv.fcgid.com dockerd[58753]: time="2022-04-28T03:17:11.900724078+07:00" level=warning msg="Your kernel does not support cgroup blki>
Apr 28 03:17:11 srv.fcgid.com dockerd[58753]: time="2022-04-28T03:17:11.900855880+07:00" level=warning msg="Your kernel does not support cgroup blki>
Apr 28 03:17:11 srv.fcgid.com dockerd[58753]: time="2022-04-28T03:17:11.937240472+07:00" level=info msg="Loading containers: start."
Apr 28 03:17:49 srv.fcgid.com dockerd[58753]: time="2022-04-28T03:17:49.602055348+07:00" level=info msg="Default bridge (docker0) is assigned with a>
Apr 28 03:17:49 srv.fcgid.com dockerd[58753]: time="2022-04-28T03:17:49.835349159+07:00" level=info msg="Firewalld: interface docker0 already part o>
Apr 28 03:17:51 srv.fcgid.com dockerd[58753]: time="2022-04-28T03:17:51.840760293+07:00" level=info msg="Loading containers: done."
Apr 28 03:18:00 srv.fcgid.com dockerd[58753]: time="2022-04-28T03:18:00.370789043+07:00" level=info msg="Docker daemon" commit=87a90dc graphdriver(s>
Apr 28 03:18:00 srv.fcgid.com dockerd[58753]: time="2022-04-28T03:18:00.554587223+07:00" level=info msg="Daemon has completed initialization"
Apr 28 03:18:02 srv.fcgid.com systemd[1]: Started Docker Application Container Engine.
Apr 28 03:18:02 srv.fcgid.com dockerd[58753]: time="2022-04-28T03:18:02.514920323+07:00" level=info msg="API listen on /var/run/docker.sock"

It means Docker Engine (docker.service) is active and running properly. Then let’s run the following command to start Minikube with Docker as a preferred driver.
E.) Try to Start Minikube with Docker Driver
$ minikube start --driver=docker
😄 minikube v1.25.2 on Redhat 8.5
✨ Using the docker driver based on user configuration
🛑 The "docker" driver should not be used with root privileges.
💡 If you are running minikube within a VM, consider using --driver=none:
📘 https://minikube.sigs.k8s.io/docs/reference/drivers/none/

❌ Exiting due to DRV_AS_ROOT: The "docker" driver should not be used with root privileges.
The response status above indicates that Minikube cannot running with superuser (root) privileges, due to security reason. So, simply exit from superuser privileges access (root) on your terminal.
F.) Exit from Root on Terminal
$ exit
G.) Then start again the Minikube with a Docker Driver.
😄 minikube v1.25.2 on Redhat 8.5
✨ Using the docker driver based on user configuration

💣 Exiting due to PROVIDER_DOCKER_NEWGRP: "docker version --format -" exit status 1: Got permission denied while trying to connect to the Docker daemon socket at unix:///var/run/docker.sock: Get "http://%2Fvar%2Frun%2Fdocker.sock/v1.24/version": dial unix /var/run/docker.sock: connect: permission denied
💡 Suggestion: Add your user to the 'docker' group: 'sudo usermod -aG docker $USER && newgrp docker'
📘 Documentation: https://docs.docker.com/engine/install/linux-postinstall/
H.) Let’s Add User to the Docker Group
Well, after read the above respose status (section G) we can conclute that there is permission issue with Docker Engine on our node server. Simply try Minikube suggestion by adding user to the ‘docker’ group using the following command.
$ sudo usermod -aG docker $USER && newgrp docker
I.) Try Again to Start Minikube
$ minikube start --driver=docker
😄 minikube v1.25.2 on Redhat 8.5
✨ Using the docker driver based on user configuration
🛑 The "docker" driver should not be used with root privileges.
💡 If you are running minikube within a VM, consider using --driver=none:
📘 https://minikube.sigs.k8s.io/docs/reference/drivers/none/

❌ Exiting due to DRV_AS_ROOT: The "docker" driver should not be used with root privileges.
J.) Exit again from root on your terminal.
The response status is “Exiting due to DRV_AS_ROOT: The “docker” driver should not be used with root privileges”.
$ exit
K.) Lastly, Let’s Start Minikube using Docker Driver
Now, you can start a cluster using docker driver without any issues. After that let minikube running smothly with docker as a driver on your local machine.
$ minikube start --driver=docker
😄 minikube v1.25.2 on Redhat 8.5
✨ Using the docker driver based on user configuration
👍 Starting control plane node minikube in cluster minikube
🚜 Pulling base image ...
💾 Downloading Kubernetes v1.23.3 preload ...
> preloaded-images-k8s-v17-v1...: 505.68 MiB / 505.68 MiB 100.00% 1.81 MiB
> gcr.io/k8s-minikube/kicbase: 379.06 MiB / 379.06 MiB 100.00% 978.22 KiB
🔥 Creating docker container (CPUs=2, Memory=2200MB) ...
🐳 Preparing Kubernetes v1.23.3 on Docker 20.10.12 ...
▪ kubelet.housekeeping-interval=5m
▪ Generating certificates and keys ...
▪ Booting up control plane ...
▪ Configuring RBAC rules ...
🔎 Verifying Kubernetes components...
▪ Using image gcr.io/k8s-minikube/storage-provisioner:v5
🌟 Enabled addons: storage-provisioner, default-storageclass
🏄 Done! kubectl is now configured to use "minikube" cluster and "default" namespace by default
L.) Set Docker as Minikube Default Driver
Apart from that, you can also make Docker as a default driver for Minikube. Simply run the following command.
$ minikube config set driver docker
❗ These changes will take effect upon a minikube delete and then a minikube start
M.) Start Again Minikube
$ minikube start
😄 minikube v1.25.2 on Redhat 8.5
✨ Using the docker driver based on existing profile
👍 Starting control plane node minikube in cluster minikube
🚜 Pulling base image ...
⌛ Another minikube instance is downloading dependencies...
🏃 Updating the running docker "minikube" container ...
🐳 Preparing Kubernetes v1.23.3 on Docker 20.10.12 ...
▪ kubelet.housekeeping-interval=5m
🔎 Verifying Kubernetes components...
▪ Using image gcr.io/k8s-minikube/storage-provisioner:v5
🌟 Enabled addons: default-storageclass, storage-provisioner
🏄 Done! kubectl is now configured to use "minikube" cluster and "default" namespace by default
5.) Let’s Verify Kubectl Configuration
The kubectl need a kubeconfig file to run, find, and access the Kubernetes cluster. It usually was created automatically when you have successfully deploy a Minikube cluster or create a cluster using kube-up.sh which available in the Kubernetes Github. Please note that kubectl configuration is located at ~/.kube/config or /home/user/.kube/config files.
$ nano ~/.kube/config (/home/fcgid/.kube/config)
apiVersion: v1
clusters:
- cluster:
certificate-authority: /home/fcgid/.minikube/ca.crt
extensions:
- extension:
last-update: Thu, 28 Apr 2022 04:39:05 WIB
provider: minikube.sigs.k8s.io
version: v1.25.2
name: cluster_info
server: https://192.168.49.2:8443
name: minikube
contexts:
- context:
cluster: minikube
extensions:
- extension:
last-update: Thu, 28 Apr 2022 04:39:05 WIB
provider: minikube.sigs.k8s.io
version: v1.25.2
name: context_info
namespace: default
user: minikube
name: minikube
current-context: minikube
kind: Config
preferences: {}
users:
- name: minikube
user:
client-certificate: /home/fcgid/.minikube/profiles/minikube/client.crt
client-key: /home/fcgid/.minikube/profiles/minikube/client.key
A.) Check Kubectl Configuration by Getting its Cluster State
You can check that kubectl is properly configured by getting its cluster state on your machine using the following command.
$ kubectl cluster-info
Kubernetes control plane is running at https://192.168.49.2:8443
CoreDNS is running at https://192.168.49.2:8443/api/v1/namespaces/kube-system/services/kube-dns:dns/proxy

To further debug and diagnose cluster problems, use 'kubectl cluster-info dump'.
The URL response above show that kubectl is correctly configured and can access your cluster without any issues.
B.) Debug and Diagnose Cluster Problems
Apart from that, you can also utilize kubectl cluster-info dump’ command to further debug and diagnose Kubernetes cluster problems on your node.
$ kubectl cluster-info dump
[fcgid@srv ~]$ kubectl cluster-info dump
{
"kind": "NodeList",
"apiVersion": "v1",
"metadata": {
"resourceVersion": "1240"
},
"items": [
{
"metadata": {
"name": "minikube",
"uid": "72625def-dcca-4f85-8b8e-44061694a7c3",
"resourceVersion": "1107",
"creationTimestamp": "2022-04-27T21:23:47Z",
"labels": {
"beta.kubernetes.io/arch": "amd64",
"beta.kubernetes.io/os": "linux",
"kubernetes.io/arch": "amd64",
........
CONCLUSION:
You have successfully installing, configuring and running Kubernetes Cluster on your local machine. Try it first on your local learning environment devices, either it on laptop, desktop PC, or workstations. Then you can deploy, scaling and manage your software or containerized applications on the development platform (VPS, Cloud or Bare-Metal Server), before move it into the actual production environment.
