
Start your VPS now with FREE $100 credit.
If you have currently planning to migrate or move your database server from MySQL 8.0 to the long-term-support version of MariaDB 10.6 database server, kindly read the following documentation. It’s quite easy to applied on your production server, either it running under VPS, Cloud or Phisycal Servers.
Or maybe you have plan to migrate your current production server from AWS (Amazon Web Service) to Google Cloud Platforms (GCP). Well, web content (its folders and files), database (all db files and its db users) are critical parts which should be touched with care and treated differently. This should be done to minimize data loss if you have plan to move your running website from the old server to new server.
Apart from that, this guide can be applied as well to migrate your running MySQL 8.0 into MariaDB 10.6 on the current server. So, you haven’t plan to move your current bare metal or cloud to the new server. It mean you can detroy (remove/uninstall) the current MySQL installation and then deploy new MariaDB environments on the same server or machine.
PREREQUISITES:
* VM, Cloud or Physical Servers
* OS Flavours: Ubuntu 20.04 LTS (Focal Fossa)
* Superuser Privileges (Root Access)
* Gnome Terminal for Linux Desktop
* PuTTy SSH Client for Windows or Mac
* Powershell for Windows 10/11
* Familiar with Basic APT Commands on Debian/Ubuntu Distros
It can be applied on all Debian/Ubuntu based distros. However, before doing it, make sure you have create backup files for all of your databases. Simply run the following command to backup your database file.
1.) Export or Backup Your Database
Just sit back and relax, since the method below it’s super easy to applied via SSH terminal or via command line only. Login to SSH terminal on your old server and then run the following commands to create backup for all of your databases.
~# mysqldump -u [username] -p [database name] > [database name].sql
For example you can use above command to backup your database with root privileges, as follow.
~# mysqldump -u root -p fcgid > fcgid.sql
PLEASE NOTE:
* mysqldump is command to backup/export database into .sql file
* root is superuser priveleges for MySQL/MariaDB Access
* fcgid is database name
* For security reason you must backup your database one by one
* Make sure to not backup all
2.) Create Backup for Website Contents (Directory, Folder and its Files)
Still logged in on your old server, you must run the following command to create full-backup of your website content, including all active directory, folder and its files.
Go to root directory or public_html folder of your website. This must be done one by one per site. Iy you have running under Nginx web server or LEMP Stack, it usually located at the following directory.
~# cd /usr/share/nginx/html
Or if you have previously deploy Nginx web server on Ubuntu 18.04 – 20.04 LTS machine using PPA (Personal Package Archive) from Launchpad repository, it usually has been compiled with the following document root (default website docs root or public_html folder for Nginx).
~# cd /var/www/
~# ls
html yourdomain.com yourdomain1.com yourdomain2.com
yourdomain3.com yourdomain4.com yourdomain5.com
Then run the following command to make a full-backup of your website content in single archive file, including all of your website folder and files.
~# tar -czvf migrate-data.tar.gz yourdomain.com
~# ls
migrate-data.tar.gz html yourdomain.com yourdomain1.com yourdomain2.com
yourdomain3.com yourdomain4.com yourdomain5.com
* PLEASE NOTE: “tar -czvf” is command to compress your website docs root into single archive file with .tar.gz archive format.
Then you can download this backup file with “wget command” via SSH terminal on the new server
3.) Uninstall MySQL 8.0 on the Current Server
On the current server (vps, cloud server or bare metal) run the following commands via command-line to uninstall, remove, or destroy the current running MySQL 8.0 database server. You should do it if you want to migrate, move or upgrade your current MySQL 8.0 to the MariaDB 10.6 database server.
~# apt-get remove –purge mysql-server mysql-client mysql-common -y
~# apt-get autoremove -y
~# apt-get autoclean
~# rm -rf /etc/mysql
4.) Add MariaDB 10.6 APT Repository to Your Ubuntu Machine
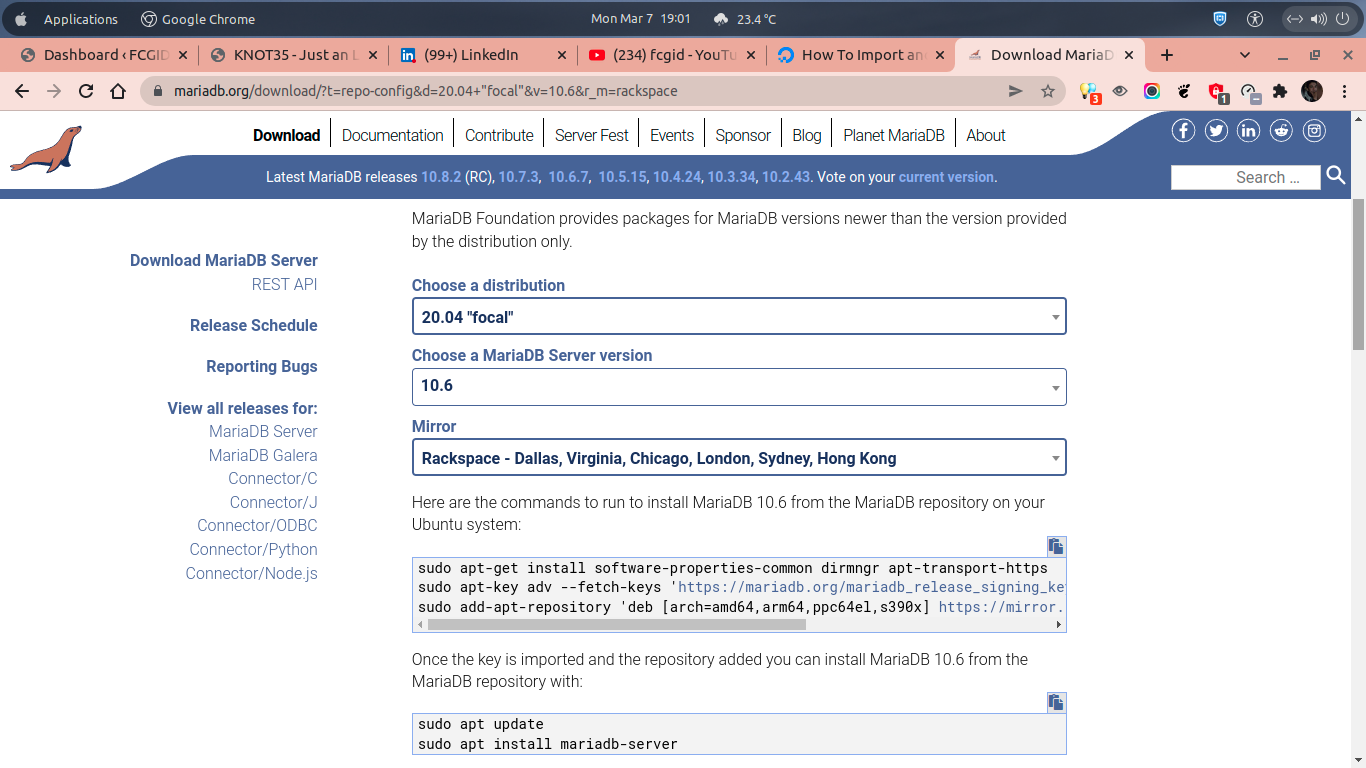
After you have uninstall MySQL 8.0 on your current system, you can continue to the next step to install and configure MariaDB 10.6 database server. Well, simply add the following MariaDB 10.6 APT Repository into your Ubuntu 20.04 LTS machine. Just do it in few simple commands below.
-------------------------------------------------------------------
~# sudo apt-get install software-properties-common dirmngr apt-transport-https
~# sudo apt-key adv --fetch-keys 'https://mariadb.org/mariadb_release_signing_key.asc'
~# sudo add-apt-repository 'deb [arch=amd64,arm64,ppc64el,s390x] https://mirror.rackspace.com/mariadb/repo/10.6/ubuntu focal main'
-------------------------------------------------------------------
You can also manually add the following MariaDB software repository packages under “/etc/apt/sources.list.d” directory. You just need to create a file named “MariaDB.list” under “/etc/apt/sources.list.d” directory. After that, put the below snippet code in the “MariaDB.list” file. Or simply add these snippet code at the bottom line of the file of “/etc/apt/sources.list”.
-------------------------------------------------------------------
# MariaDB 10.6 repository list - created UTC
# https://mariadb.org/download/
deb [arch=amd64,arm64,ppc64el,s390x] https://mirror.rackspace.com/mariadb/repo/10.6/ubuntu focal main
deb-src https://mirror.rackspace.com/mariadb/repo/10.6/ubuntu focal main
-------------------------------------------------------------------
5.) Next, Let’s Install MariaDB 10.6 Database Server
Both software or package dependencies and MariaDB signing key have been imported into your system. Next, update your software repository packages and then let’s install MariaDB 10.6 database server with the following commands.
~# sudo apt update
~# sudo apt install mariadb-server
6.) Enable, Start and Securing or Harden Your MariaDB 10.6 Server
~# systemctl enable mysql.service
~# systemctl start mysql.service
~# mysql_secure_installation
7.) Upgrade or Force Upgrade Your Database Server from MySQL 8.0 to MariaDB 10.6
During installation progress MariaDB 10.6 will force to upgrade all of your mysql database files, including database tables, database names, database users, database schema, and much more. You can add –force at the end of the following command if you want to force MariaDB to run “mysql_upgrade”.

~# mysql_upgrade
Enter password:
OR
~# mysql_upgrade --force
Enter password:
OR
~# mysql_upgrade -u root -p
Enter password:
OR
~# mysql_upgrade -u root -p --force
Enter password:
This installation of MariaDB is already upgraded to 10.6.7-MariaDB.
There is no need to run mysql_upgrade again for 10.6.7-MariaDB.
You can use --force if you still want to run mysql_upgrade
root@fcgid-MS-7C13:/etc/mysql# mysql_upgrade -u root -p --force
Phase 1/7: Checking and upgrading mysql database
Processing databases
mysql
mysql.column_stats OK
mysql.columns_priv OK
mysql.db OK
mysql.event OK
mysql.func OK
mysql.global_priv OK
mysql.gtid_slave_pos OK
mysql.help_category OK
mysql.help_keyword OK
mysql.help_relation OK
mysql.help_topic OK
mysql.index_stats OK
mysql.innodb_index_stats OK
mysql.innodb_table_stats OK
mysql.plugin OK
mysql.proc OK
mysql.procs_priv OK
mysql.proxies_priv OK
mysql.roles_mapping OK
mysql.servers OK
mysql.table_stats OK
mysql.tables_priv OK
mysql.time_zone OK
mysql.time_zone_leap_second OK
mysql.time_zone_name OK
mysql.time_zone_transition OK
mysql.time_zone_transition_type OK
mysql.transaction_registry OK
Phase 2/7: Installing used storage engines... Skipped
Phase 3/7: Fixing views
mysql.user OK
sys.host_summary OK
sys.host_summary_by_file_io OK
sys.host_summary_by_file_io_type OK
sys.host_summary_by_stages OK
sys.host_summary_by_statement_latency OK
sys.host_summary_by_statement_type OK
sys.innodb_buffer_stats_by_schema OK
sys.innodb_buffer_stats_by_table OK
sys.innodb_lock_waits OK
sys.io_by_thread_by_latency OK
sys.io_global_by_file_by_bytes OK
sys.io_global_by_file_by_latency OK
sys.io_global_by_wait_by_bytes OK
sys.io_global_by_wait_by_latency OK
sys.latest_file_io OK
sys.memory_by_host_by_current_bytes OK
sys.memory_by_thread_by_current_bytes OK
sys.memory_by_user_by_current_bytes OK
sys.memory_global_by_current_bytes OK
sys.memory_global_total OK
sys.metrics OK
sys.processlist OK
sys.ps_check_lost_instrumentation OK
sys.schema_auto_increment_columns OK
sys.schema_index_statistics OK
sys.schema_object_overview OK
sys.schema_redundant_indexes OK
sys.schema_table_lock_waits OK
sys.schema_table_statistics OK
sys.schema_table_statistics_with_buffer OK
sys.schema_tables_with_full_table_scans OK
sys.schema_unused_indexes OK
sys.session OK
sys.session_ssl_status OK
sys.statement_analysis OK
sys.statements_with_errors_or_warnings OK
sys.statements_with_full_table_scans OK
sys.statements_with_runtimes_in_95th_percentile OK
sys.statements_with_sorting OK
sys.statements_with_temp_tables OK
sys.user_summary OK
sys.user_summary_by_file_io OK
sys.user_summary_by_file_io_type OK
sys.user_summary_by_stages OK
sys.user_summary_by_statement_latency OK
sys.user_summary_by_statement_type OK
sys.version OK
sys.wait_classes_global_by_avg_latency OK
sys.wait_classes_global_by_latency OK
sys.waits_by_host_by_latency OK
sys.waits_by_user_by_latency OK
sys.waits_global_by_latency OK
sys.x$host_summary OK
sys.x$host_summary_by_file_io OK
sys.x$host_summary_by_file_io_type OK
sys.x$host_summary_by_stages OK
sys.x$host_summary_by_statement_latency OK
sys.x$host_summary_by_statement_type OK
sys.x$innodb_buffer_stats_by_schema OK
sys.x$innodb_buffer_stats_by_table OK
sys.x$innodb_lock_waits OK
sys.x$io_by_thread_by_latency OK
sys.x$io_global_by_file_by_bytes OK
sys.x$io_global_by_file_by_latency OK
sys.x$io_global_by_wait_by_bytes OK
sys.x$io_global_by_wait_by_latency OK
sys.x$latest_file_io OK
sys.x$memory_by_host_by_current_bytes OK
sys.x$memory_by_thread_by_current_bytes OK
sys.x$memory_by_user_by_current_bytes OK
sys.x$memory_global_by_current_bytes OK
sys.x$memory_global_total OK
sys.x$processlist OK
sys.x$ps_digest_95th_percentile_by_avg_us OK
sys.x$ps_digest_avg_latency_distribution OK
sys.x$ps_schema_table_statistics_io OK
sys.x$schema_flattened_keys OK
sys.x$schema_index_statistics OK
sys.x$schema_table_lock_waits OK
sys.x$schema_table_statistics OK
sys.x$schema_table_statistics_with_buffer OK
sys.x$schema_tables_with_full_table_scans OK
sys.x$session OK
sys.x$statement_analysis OK
sys.x$statements_with_errors_or_warnings OK
sys.x$statements_with_full_table_scans OK
sys.x$statements_with_runtimes_in_95th_percentile OK
sys.x$statements_with_sorting OK
sys.x$statements_with_temp_tables OK
sys.x$user_summary OK
sys.x$user_summary_by_file_io OK
sys.x$user_summary_by_file_io_type OK
sys.x$user_summary_by_stages OK
sys.x$user_summary_by_statement_latency OK
sys.x$user_summary_by_statement_type OK
sys.x$wait_classes_global_by_avg_latency OK
sys.x$wait_classes_global_by_latency OK
sys.x$waits_by_host_by_latency OK
sys.x$waits_by_user_by_latency OK
sys.x$waits_global_by_latency OK
Phase 4/7: Running 'mysql_fix_privilege_tables'
Phase 5/7: Fixing table and database names
Phase 6/7: Checking and upgrading tables
Processing databases
information_schema
performance_schema
sys
sys.sys_config OK
Phase 7/7: Running 'FLUSH PRIVILEGES'
OK
Well, from this step you have successfully on migrate your database server from MySQL 8.0 to the MariaDB 10.6. Kindly try to use this tutorial or guide on your production servers, since this is have been tested many time on my production and development server. Or if you are still unsure on this guide you can buy a cheap $5-$10 vps or cloud server either it on Digital Ocean, Vultr, Linode, Amazon Web Service (AWS) or Google Cloud Platform (GCP), then try to use this tutorial. See you next time… 🙂
