
Start your VPS now with FREE $100 credit.
ROOT access or SUDO privileges is one of the most important aspects used in the Linux server-based web hosting and cloud computing industry.
With sudo or ROOT privileges we can do whatever we want on a machine with a Linux-based distro, such as installing or removing certain packages that require sudo privileges.
Without root privileges, we will find it very difficult to manage on a Linux server-based system. Although in many cases general user permissions are more recommended to be used, especially for GUI-based server environments such as cPanel-WHM and Plesk.
Well, today we are going to teach you about how to enable sudo or root privileges on a Debian-Ubuntu Linux based distribution system.
This is very easy to do from your side, just follow this tutorial in a few steps and you will then get sudo privileges and root access on your Linux machine.
Make sure you meet the following requirements before enabling root privileges.
This tutorial can be applied on all Debian-based distributions, including Debian 9/10/11 and Ubuntu 18.04 LTS, 20.04 LTS, as well as the latest stable version of Ubuntu 22.04 LTS (Jammy Jellyfish).
You can modify it on almost any VPS or Cloud Services like Vultr, Linode, Digital Ocean, Amazon Web Service (AWS), or Google Cloud Platform (GCP).
Pre-requisites:
- VPS, Cloud, Bare Metal or Physical Servers
- Running under distro Debian or Ubuntu
- Superuser Privileges or Root Access
- Must Be Familiar with Linux Command Line (CLI-Based Only)
- gNome Terminal for Linux Desktop
- PuTTy SSH Client for Windows and MacOS
- PowerShell for Windows 10/11
1. Login to your server via SSH terminal
Make sure you can login to your server using common user privileges, such as the following command line:
$ ssh debian@server_IPv4_address -p22
$ ssh ubuntu@server_IPv4_address -p22
Please Note: Please replace the debian/ubuntu user, server_IPv4_address and port 22 (p22) above with your actual server credentials.
2. Execute SUDO SU Command
Then simply run the following SUDO SU commands.
$ sudo su
[sudo] password for debian:
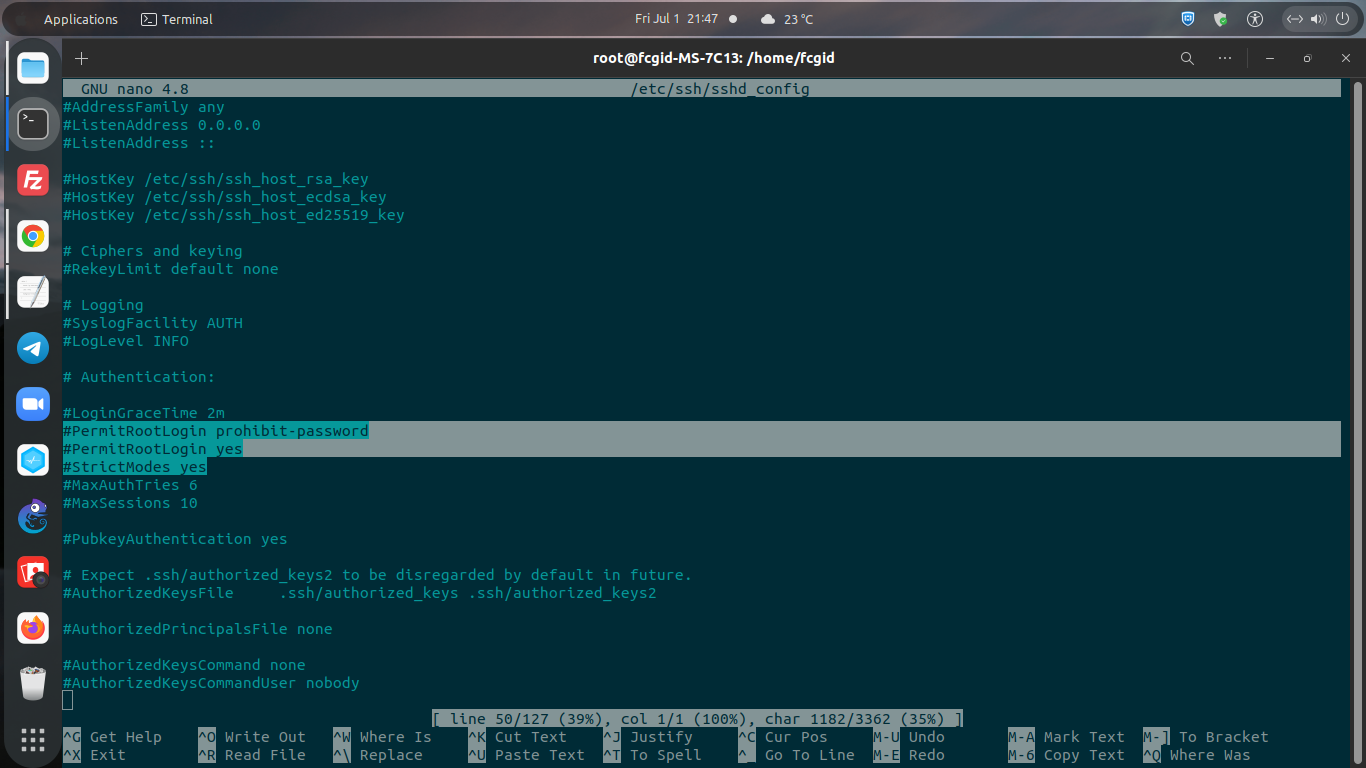
3. Edit File sshd_config
Then simply run the following command to edit the sshd_config file inside directory of /etc/ssh/. You are allowed to use your favorite editor, be it vim, gedit, or nano editor.
Well, in this tutorial we will prefer to use the nano editor instead of vim or gedit.
$ nano /etc/ssh/sshd_config
4. Uncomment and Enable Some System Variables
After that make sure to uncomment and enable the following system variables. Uncomment, and then you can change the variable from “no” or “prohibit-password” to “yes”, as follow.
$ nano /etc/ssh/sshd_config
----------------------------------------------------
PermitRootLogin yes
PasswordAuthentication yes
StrictModes yes
----------------------------------------------------
For older version Ubuntu 14.04 LTS (Trusty Tahr) make sure you have to uncomment “AllowUsers root”. However, please note that the Ubuntu 14.04 – 16.04 LTS is now deprecated, as this version has reached its end of life.
5. Restart SSH Service
Just restart the ssh service after you apply the above scheme.
$ service ssh restart
OR
$ systemctl restart ssh
OR
$ systemctl restart ssh.service
Conclusion
Now you know that to get SUDO privileges or root access from a Debian/Ubuntu-based machine is very easy to do.
Just follow a few steps above and you will get SUDO privileges and root access in order to manage your Linux server.
