
Start your VPS now with FREE $100 credit.
On the previous article (How To Install MySQL 8.0 on AlmaLinux 8.5) we’ve learn together on how to deploy MySQL 8.0.26 on AlmaLinux 8.5. Well, now it’s time to create database, user along with its password on your machine. So, we can utilize this machine to run either it development or production server to hosted a website. From this step you should familiar with CLI-base only or command-line on any Linux terminal.
The machine we’ve using right now is the same as we use to install MySQL 8.0 on the previous post, it’s still cheap $5 VPS from UpCloud with Free Trial.
PREREQUISITES:
* VPS, CLoud or Bare Metal
* Superuser Privileges (Root Access)
* Server IPv4 Address & Its Password
* Running Under AlmaLinux 8.5 OS
* Must Have Running MySQL 8.0 Database Server
* Gnome Terminal for Linux Desktop
* PuTTy SSH Client for Windows or MacOS
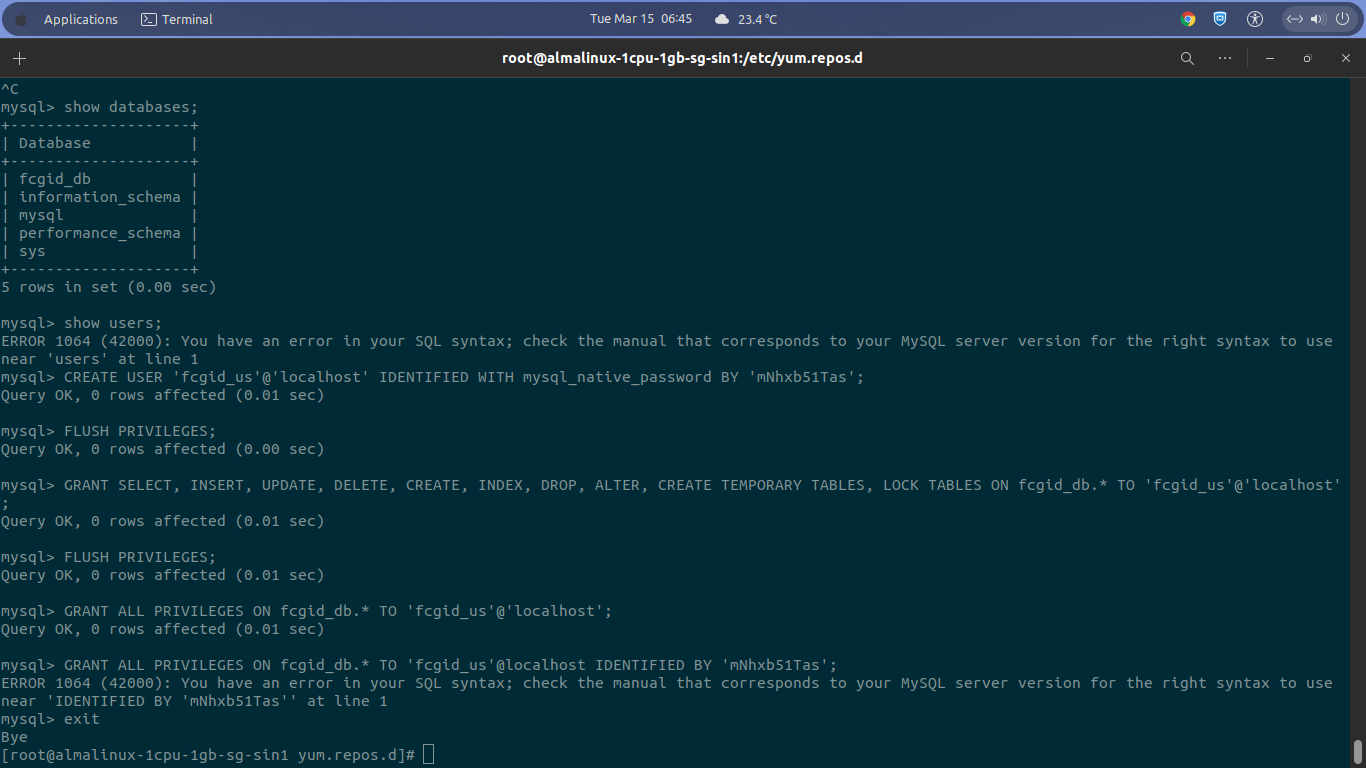
Let’s create your firts database and its user via command line using the following commands. Below is example of snippet code to create database, user, set the password and grant all priveleges to the certain user on the latest GA Release of MySQL 8.0.
$ CREATE DATABASE database_name;

$ CREATE USER 'database_user'@'localhost' IDENTIFIED WITH mysql_native_password BY 'database_user_password';

$ GRANT SELECT, INSERT, UPDATE, DELETE, CREATE, INDEX, DROP, ALTER, CREATE TEMPORARY TABLES, LOCK TABLES ON database_name.* TO 'database_user'@'localhost';

$ GRANT ALL PRIVILEGES ON database_name.* TO 'database_user'@'localhost';

$ FLUSH PRIVILEGES;

$ exit
Now, I will show you on how to create it via MySQL command line interface.
1.) Connect to the MySQL Command-Line Interface (MySQL CLI)
Connect to your MySQL 8.0 database server via Linux terminal or PuTTy Client using the following commands.
$ mysql -u root -p
Password:
Welcome to the MySQL monitor. Commands end with ; or \g.
Your MySQL connection id is 10
Server version: 8.0.26 Source distribution

Copyright (c) 2000, 2021, Oracle and/or its affiliates.

Oracle is a registered trademark of Oracle Corporation and/or its
affiliates. Other names may be trademarks of their respective
owners.

Type 'help;' or '\h' for help. Type '\c' to clear the current input statement.
2.) Let’s Create a Database.
For example, I will create a database with the name “fcgid_db”.
mysql> CREATE DATABASE fcgid_db;
Query OK, 1 row affected (0.01 sec)
3.) For MySQL 5.7 and MySQL 8.0
On MySQL 5.7 or newer version like MySQL 8.0 we should use this command to create database user and assign the correct password. Here’s I will create database user called a “fcgid_us”.
mysql> CREATE USER 'fcgid_us'@'localhost' IDENTIFIED WITH mysql_native_password BY 'mNhxb51Tas';
Query OK, 0 rows affected (0.01 sec)
4.) Grant Specific Privileges
If you want to Grant specific privileges on the specific database to its user, you can use the following command.
mysql> GRANT SELECT, INSERT, UPDATE, DELETE, CREATE, INDEX, DROP, ALTER, CREATE TEMPORARY TABLES, LOCK TABLES ON fcgid_db.* TO 'fcgid_us'@'localhost';
Query OK, 0 rows affected (0.01 sec)
5.) Set Grant All Privileges
On almost all WordPress-based site we should set to “Grant All Privileges” on the database to its user in order to make the WordPress installation running smoothly without any issues.
mysql> GRANT ALL PRIVILEGES ON fcgid_db.* TO 'fcgid_us'@'localhost';
Query OK, 0 rows affected (0.01 sec)
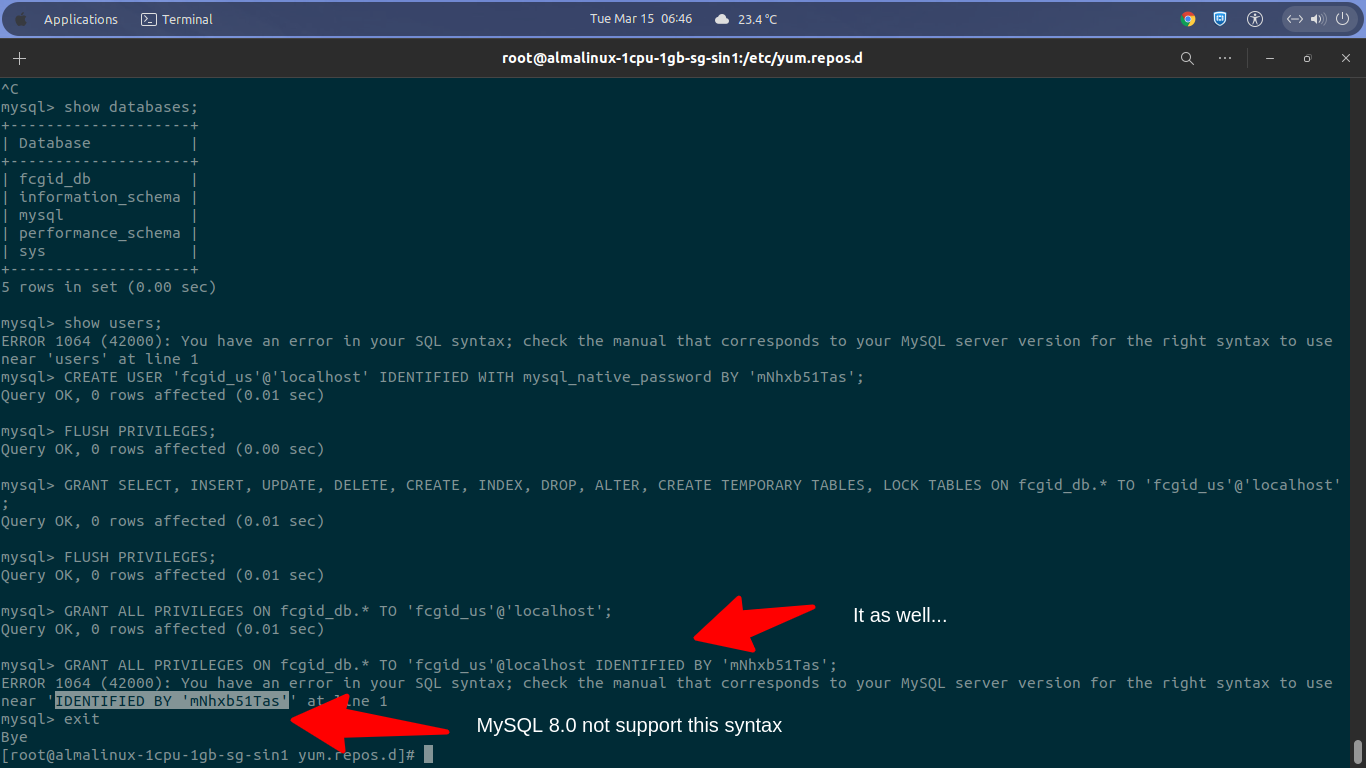
6.) Don’t Forget to Run Flush Privileges Command
mysql> FLUSH PRIVILEGES;
Query OK, 0 rows affected (0.00 sec)
7.) Lastly, Exit from the MySQL Command-Line Interface (MySQL CLI)
mysql> exit
Bye
Well, from this step you have done in creating database, user, set the password, and grant correct privileges on the specific database to its user. After this step you can continue to the next installation of your CMS (Content Management System) like WordPress, Joomla, or Drupal.
