On today’s tutorial we will guide you on how to change SSH port number on CentOS Stream 9. As you know that CentOS Stream 9 is a successor of CentOS Stream 8 which will reach its end of life on 31 May, 2024. Altough RedHat have killed of the CentOS Project, but the CentOS Project is still running itself unnoticed by the open source community.
As the next major release of CentOS Stream distribution system, CentOS Stream 9 is still based on Red Hat source code and Fedora 34, exactly the Red Hat Enterprise Linux 9 (RHEL). And it specially developed by engineering team under Red Hat company along with the CentOS and open source community.
Before moving into the next step, make sure to meet the following requirenments.
PREREQUISITES:
* VPS, Cloud or Bare-Metal
* Running under CentOS Stream 9
* Server IPv4 Address with Superuser Privileges (Root Access)
* Nano or VIM Editor
* Gnome Terminal for Linux Desktop
* PuTTy SSH Client for Windows or Mac
* Powershell for Windows 10/11
1.) Login to the Server via SSH Console
For learning purpose I will use cheap $5 vps or droplets from Digital Ocean. Login to your server via SSH terminal with the following command, and make sure to change the server IP with your actual server IPv4 address.
$ ssh [email protected]
The authenticity of host '104.131.86.105 (104.131.86.105)' can't be established.
ECDSA key fingerprint is SHA256:GnXiDd741Qr/ZZlXG/rB2QFDIwn5/RXwWRdK80NFzVU.
Are you sure you want to continue connecting (yes/no/[fingerprint])? yes
Warning: Permanently added '104.131.86.105' (ECDSA) to the list of known hosts.
[email protected]'s password:
Activate the web console with: systemctl enable --now cockpit.socket
2.) Install Editor
You can install and use your prefered editor on Linux, either it nano or VIM. Simply run the following command to install nano editor.
$ dnf install nano -y
Last metadata expiration check: 0:02:54 ago on Thu 26 May 2022 12:20:30 AM EDT.
Dependencies resolved.
=====================================================================================================================================================
Package Architecture Version Repository Size
=====================================================================================================================================================
Installing:
nano x86_64 5.6.1-5.el9 baseos 710 k

Transaction Summary
=====================================================================================================================================================
Install 1 Package

Total download size: 710 k
Installed size: 2.7 M
Downloading Packages:
nano-5.6.1-5.el9.x86_64.rpm 1.3 MB/s | 710 kB 00:00
-----------------------------------------------------------------------------------------------------------------------------------------------------
Total 1.0 MB/s | 710 kB 00:00
CentOS Stream 9 - BaseOS 1.6 MB/s | 1.6 kB 00:00
Importing GPG key 0x8483C65D:
Userid : "CentOS (CentOS Official Signing Key) <[email protected]>"
Fingerprint: 99DB 70FA E1D7 CE22 7FB6 4882 05B5 55B3 8483 C65D
From : /etc/pki/rpm-gpg/RPM-GPG-KEY-centosofficial
Key imported successfully
Running transaction check
Transaction check succeeded.
Running transaction test
Transaction test succeeded.
Running transaction
Preparing : 1/1
Installing : nano-5.6.1-5.el9.x86_64 1/1
Running scriptlet: nano-5.6.1-5.el9.x86_64 1/1
Verifying : nano-5.6.1-5.el9.x86_64 1/1

Installed:
nano-5.6.1-5.el9.x86_64

Complete!
3.) Check the Firewall Status
Check if there is any Firewall service running inside your CentOS 9 machine. Usually is Firewalld or Iptables which is installed by default on RHEL-based distros like CentOS, CloudLinux, Oracle Linux, Rocky Linux and AlmaLinux.
$ systemctl status firewalld
Unit firewalld.service could not be found.
It means there are no Firewall running inside your CentOS 9 machine. Simply run the following command to install the Firewalld.
$ yum install firewalld
DigitalOcean Agent 40 kB/s | 3.3 kB 00:00
DigitalOcean Droplet Agent 33 kB/s | 3.3 kB 00:00
Dependencies resolved.
=====================================================================================================================================================
Package Architecture Version Repository Size
=====================================================================================================================================================
Installing:
firewalld noarch 1.0.0-2.el9 baseos 504 k
Installing dependencies:
firewalld-filesystem noarch 1.0.0-2.el9 baseos 9.0 k
ipset x86_64 7.11-6.el9 baseos 41 k
ipset-libs x86_64 7.11-6.el9 baseos 67 k
iptables-nft x86_64 1.8.7-28.el9 baseos 204 k
libnftnl x86_64 1.1.9-4.el9 baseos 85 k
nftables x86_64 1:0.9.8-12.el9 baseos 363 k
python3-firewall noarch 1.0.0-2.el9 baseos 380 k
python3-nftables x86_64 1:0.9.8-12.el9 baseos 19 k
Installing weak dependencies:
libcap-ng-python3 x86_64 0.8.2-7.el9 appstream 30 k

Transaction Summary
=====================================================================================================================================================
Install 10 Packages

Total download size: 1.7 M
Installed size: 6.0 M
Is this ok [y/N]: y
Check again the Firewalld status with the following command.
$ systemctl status firewalld
○ firewalld.service - firewalld - dynamic firewall daemon
Loaded: loaded (/usr/lib/systemd/system/firewalld.service; enabled; vendor preset: enabled)
Active: inactive (dead)
Docs: man:firewalld(1)
Then enable and start the Firewalld service using the following command.
$ systemctl enable firewalld
$ systemctl start firewalld
Check again the Firewalld status.
$ systemctl status firewalld
● firewalld.service - firewalld - dynamic firewall daemon
Loaded: loaded (/usr/lib/systemd/system/firewalld.service; enabled; vendor preset: enabled)
Active: active (running) since Thu 2022-05-26 00:33:02 EDT; 11s ago
Docs: man:firewalld(1)
Main PID: 11792 (firewalld)
Tasks: 2 (limit: 5741)
Memory: 23.4M
CPU: 601ms
CGroup: /system.slice/firewalld.service
└─11792 /usr/bin/python3 -s /usr/sbin/firewalld --nofork --nopid

May 26 00:33:01 open-source.project systemd[1]: Starting firewalld - dynamic firewall daemon...
May 26 00:33:02 open-source.project systemd[1]: Started firewalld - dynamic firewall daemon.
To Stop Firewalld.
$ systemctl stop firewalld
To Restart Firewalld.
$ systemctl restart firewalld
Then simply add your custom SSH port number on FirewallD using the following command. For example, if you want to use port 4322 you can whitelisted with the following command.
$ sudo firewall-cmd --add-port 4322/tcp
success

$ sudo firewall-cmd --add-port 4322/tcp --permanent
success

$ sudo firewall-cmd --zone=public --permanent --add-port=4322/tcp
Warning: ALREADY_ENABLED: 4322:tcp
success
Then restart the Firewalld service with the following command.
$ systemctl restart firewalld
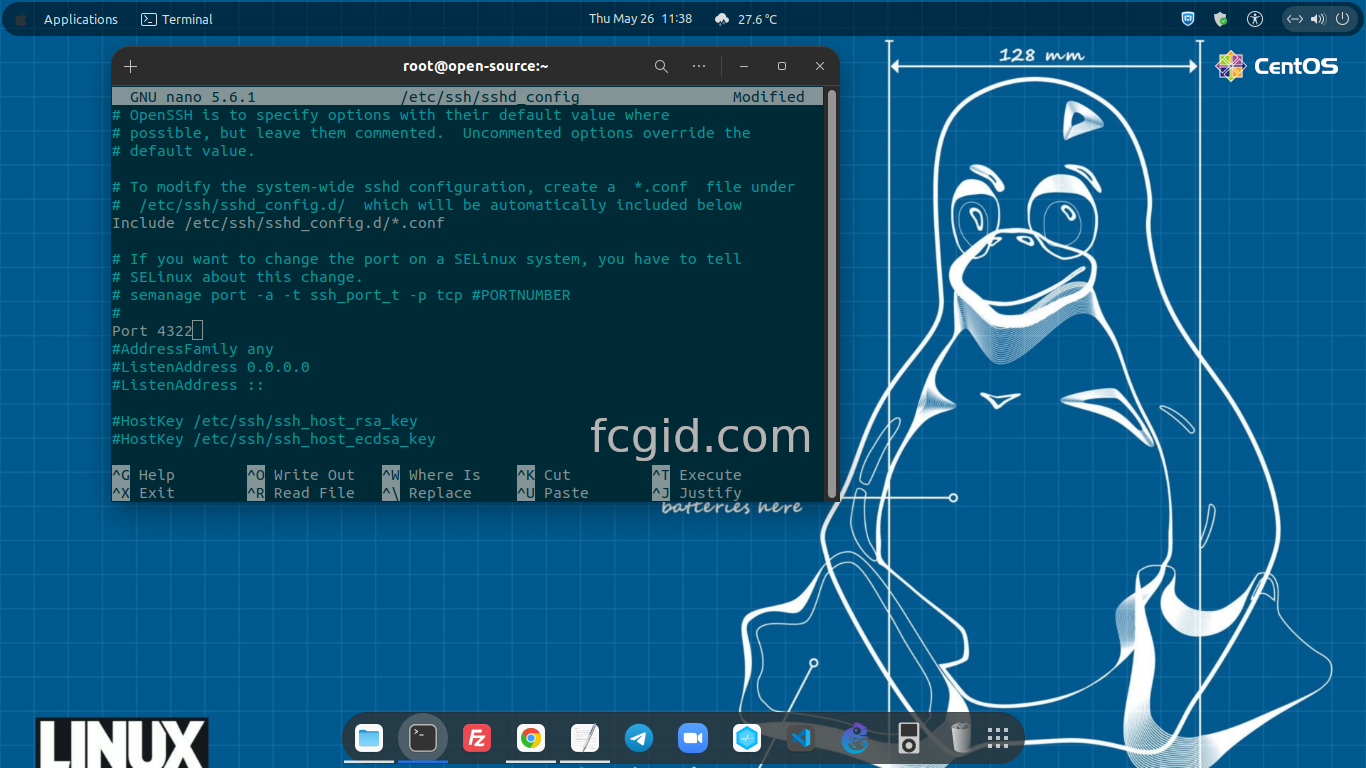
4.) Change SSH Port Number
After that simply change the SSH port number on file sshd_config under directory of /etc/sshd, as follow.
$ nano /etc/ssh/sshd_config
5.) Restart SSH Service
Then you can restart the SSH service with the following command.
$ systemctl restart sshd
CONCLUSIONS:
You’ve been successfully change the SSH port number. So you will have the secure CentOS machine environment with the secure port number, rather than using default port number. And it will make the dark harker to access your machine without knowing the actual port number of your machine.


